Pages

Monday, August 31, 2009

Orientaals/ Oriental


Veel orientaalse stempels heb ik niet, maar als er bij Michael Strong yahoogroep een uitdaging me dat thema is, dan moet ik toch wat. In combinatie met (lang bewaarde) 3d plaatjes en stempels van Michael Strong heb ik deze kaarten gemaakt.

I do not have a collection of oriental stamps, but if there is a challenge on Michael Strong's yahoogroup, than I need to come up with something. So in combination with (long save) 3d pictures and some of Michael Strongs stamps I came up with these cards.


Friday, August 28, 2009

Wednesday Stamper: DOG

Eindelijk weer eens een kaartje voor de Wednesday Stamper. Het thema deze week is "hond".
Deze hondjes zijn de nieuwe mini hondjes van Michael Strong en de tekst is van een oude um sheet Pets van Club Scrap. Op de achtergrond zie je pootjes in de gesso techniek.
It has been a while, but here is my contribution for this weeks Wednesday Stamper. The theme is "dog" and I used Michael Strongs new mini dogs and a um text from Pets by Club Scrap. The paws you see in the background are done in the gesso technique.

Thursday, August 27, 2009

Paper Lace

Ik heb een nieuw techniekje voor jullie! Het lijkt een beetje op kant, maar het is gemaakt met tyvek. Hier eerst de kaart en dan vind je de uitleg. Ik heb hievoor stempels van Michael Strong gebruikt en de tekst is van Club Scrap.

Here is a new technique for you. It looks a litle like lace, but it is made with tyvek. First see the card. I used stamps by Michael Strong and the sentiment is by Club Scrap. Wat heb je nodig? een tyvek envelop, een strijkijzer, bakpapier, lumiere verf, clear embossing inkt (ik gebruik die van Ranger) en je stempel. Ik moet je wel zeggen, dat het even oefenen is voor je het goede resultaat hebt. Bold stempels doen het het beste.

What do you need? a tyvek envelop, an iron, baking paper, lumiere paint, clear embossing ink ( I use Ranger) and your choise of stamp. I must confess it takes some practice for best result. Bold stamps work best.
1. Knip een stuk tyvek van de envelop (liefst waar geen tekst is) en geef het met lumiere een kleurtje. Even laten drogen.
1. Cut a piece of tyvek from your envelop ( notive there is no text on it) and color it with the lumiere paint. Let it dry.
2. Dep je stempel even goed met het embossing inktkussen.
2. Dab some embossing ink on your stamp.

3. Maak een sandwich van eerst je stempel, dan de tyvek met de verf naar boven en dan het bakpapier.
3. Make a sandwich of first your stamp, than the tyvek with the paint upwards and on top the baking paper.
4. Nu gaan we de strijkbout gebruiken. Hij staat op heet en je houdt hem 3-5 seconden op het bakpapier. Ja het is even oefenen.
4. Now we are going to use the iron. It is on hot and you keepit 3-5 seconds on the baking paper. Yes, it needs a little practice.
5. Dit is het resultaat. Dat dondere driehoekje wat je ziet, is het rode van de envelop. Nu kun je het verwerken op je kaart.
5. This is the result. The dark triangle you see, is some red from the envelop. Now you can use it on your card.

Wednesday, August 26, 2009

Kaleidoscope

Hier is een heel leuk nieuw project van Club Scrap . Makkelijk te doen met een filmpje! Ga maar lekker kijken. Leuk om met je kinderen te doen.

Here another new and fun project by Club Scrap. There is also a video to make it easy for you. Go and watch. It is fun to do with your kids.

Tuesday, August 25, 2009

Happiness

Is ze niet mooi?! Ja, het trouwalbum is nu bijna klaar en met het nieuwe papier van Club Scrap worden de laatste pagina's ook weer prachtig. Heb voor deze pagina het papier van de Apothecary gebruikt. Dat is de nieuwe kit van Club Scrap. Met zo'n titel denk je niet meteen aan trouwfoto's. Voor de bloemen heb ik verschillende maten bloem ponsen gebruikt. Op het bovenste bloemetje heb ik nog een UM stempel met tekst gebruikt in de bordeaux rode kleur van het papier. Wil je de rest van het album ook zien? Neem dan hier een kijkje: Trouwalbum. Isn't she a beauty?! Yes, the wedding album is nearly finished now. With the new paper from Club Scrap the last pages will also be perfect. For this page I used Apothecary paper. That is the latest kit from Club Scrap. With a title like this you wouldn't think bridal pictures, but look it works great. The flowers are done with different sizes flower punches. The top flower is also stamped with bourgondy ink and UM stamps from this kit. Would you like to see more of the wedding album? Than take a look here: Wedding.

Sunday, August 23, 2009

Gesmolten Krijtjes/ Melted Crayons

Onlangs kwam ik deze leuke techniek tegen: gesmolten krijtjes. Het was op Jacquie's blog: After Hours Stamper. Dit moest ik proberen en het is echt leuk om te doen. Hier twee van mijn eerste probeersels met de stempels van Michael Strong. Ik heb krijtjes van de Hema gebruikt. Het zijn er 18 in een doos voor € 2,75.
Bij de tweede kaart heb ik ook nog het restje wax papier gebruit als achtergrond. Met de krijtkant op een correspondentie kaartje gelegd en door de cuttlebug gehaald.

Recently I discoverd a new technique: melted crayon. I found it on Jacquie's blog: After Hours Stamper. I just had to try this and it is so much fun to do. Here are my first two cards with Michael Strong stamps.
For the second card I also used the left over wax paper. Take a pice of white cardstock and put the wax paper with the crayon side on the paper and run it trough your cuttlebug.

Monday, August 17, 2009

Michael Strong recycle idea

Dat ik een fan ben van de stempels van Michael Strong hebben jullie vast wel door als je mijn blog af en toe bezoekt. Dat hij ook leuke recycle ideeen heeft, weet je misschien niet, maar dat is echt zo. Vandaag stond op zijn blog zo'n leuk en simpel idee, dat ik er maar meteen een kaartje mee heb gemaakt. Wil je weten wat het is???? Ga maar gauw kijken op het BLOG van Mike. When you have visited my blog, you know I am a big fan of stamps by Michael Strong. Do you know he also has some great recycle ideas? Today I found a very simple one on his blog and had to make this card right away. You want to know what it is? Please visit Mikes BLOG!

Sunday, August 16, 2009

Kaart met / Card with Nestabilities

Nestabilities zijn echt geweldig bij het maken van kaarten. Hier heb ik een leuk bloem kaartje gemaakt. Je hebt nodig een cirkel en een bijpassende scallop nestability. Natuurlijk papier naar keuze. Ik heb hier Club Scrap papier, stempels en cut outs gebruikt.

Nestabilities are great to use when making cards. Here I made a fun flower card. You need a circle and matching scallop nestablility. Of course papers of your own choice. I used Club Scrap papers, stamp and cut outs.

1. Neem je papier voor het midden gedeelte en vouw dit dubbel. Leg je cirkel klaar.

1. Take your paper that you use for the middle part and fold it double. Have your circle ready.
2. Leg de cirkel net is over het midden van het papier. Op deze manier blijft de uitgesnede cirkel aan elkaar vast zitten.
2. Lay the circle a little over the middle of your paper. This way the circle stays connected.
3. Het midden deel is nu het kaartje.
3. The middle part is now a card.
4. Neem nu de scallop en snij een bloem uit een enkel papier.
4. Take the scallop and cut a flower from a single sheet of paper.
5. Je hebt nu alle onderdelen om de kaart af te maken.
5. Now you have all the parts to make the card.
6. Decoreer nu eerst het kaartje zoals je dat leuk vindt.
6. Decorate first the card as you like it.
7. Ben je daarmee klaar, dan plak je het kaartje op de bloem.
7. Are you ready decorating? Now you can glue the card on the flower.

Friday, August 14, 2009

Gesso

Gesso is zo'n leuk goedje om te gebruiken. Schilders gebruiken het, maar voor het stempelen is het ook heel erg leuk. Voor deze techniek heb je naast je stempels (grove stempels werken het best) alleen een pot gesso en een kwast nodig. Je neemt een stuk gekleurd stevig papier en smeert er een redelijke laag gesso op. Neem dan je stempel en druk die op verschillende plaatsen op het papier. Nu goed laten drogen en dan verwerken op een kaart.

Wil je geen witte achtergrond? Neem dan je glimmer mist en spuit er een kleurtje over heen (het wordt dan wel wat dof) of neem een druppeltje reinker en meng dit met je gesso voordat je het op je papier smeert.

Mijn voorbeelden zijn gemaakt met Papier van Club Scrap, stempels van Michael Strong (vis, bloemen en vaas), Club Scrap (vlinder) en Hero Arts (tekst).


Gesso is a wonderful medium to use. It is used by painters, but for stampers it is also great. For this technique you need, beside your stamps (bold stamps work best), only gesso and a brush.
Take a piece of colored cardstock and brush some gesso richly on the paper. Take your stamp and push it into the gesso on several places. Leave it to dry. After it is dry you can use it on your card anyway you want.

Don't you like the white color as a background? Here is an easy way to change the colour. Take your glimmer mist and spray it on the gesso. It will be little less shiny than you are used to. Also you can take some drops of reinker and add this to the gesso before you brush it on the paper.
My samples are made on Club Scrap paper. Stamps I used are by Michael Strong (fish, flowers and vase), Club Scrap (butterfly) and Hero Arts (sentiment).

Tuesday, August 11, 2009

Last week Club Scrap Summer Camp

De laatste week van het zomerkamp bij Club Scrap. Het was 5 weken scrappen en kaarten maken en iedere week hoorde er een opdracht bij. Deze week is de laatste week en je moet bij elk werkstuk drie verschillende kits gebruiken (dat kan zijn papier, stempels of wat er ook maar in de Club Scrap dozen zit). Geweldig! Lekker al je dozen doorspitten en kijken wat er bijelkaar past en wat je kan gebruiken. Zo vindt je ook nog eens wat. Bijvoorbeeld een pakket waarmee je een waterval kaart en scrap pagina kan maken. Het is niet iets nieuws, maar wel leuk om te doen en had zo alles bij de hand!
In de cinema bij Club Scrap kun je er een filmpkje van zien:
http://www.clubscrapcommunity.com/component/seyret/?task=videodirectlink&id=94


It is the last week of Summer Camp at Club Scrap. For 5 weeks we scrapped and stamped with a theme. It was so much fun. Now it is the last week and we have to use three different kits in our projects (this can be paper, stamps or other items one finds in the pizzabox). This is great. Looking through all your boxes and see what you can use. An you know what? Even finding some projects ready to go, like this waterfall card and scrap page. It isn't anything new, but fun to do and everything ready to go. There is a video in the Club Scrap cinema about this technique for you to watch:

Monday, August 10, 2009

Nieuwe nieuwsbrief Technique Junkies/ New Newsletter Technique Junkies

JAAAAAA! Hij is er weer. De nieuwe nieuwsbrief van de Technique Junkies propvol met leuke stempel technieken om te proberen. Vandaag begonnen met de zig-zag technique. Heb hiervoor Daisy Bucket papier gebruikt en stempels van Stampin'Up!
YESSSSSSSSSSSSSS!! The new Technique Junkie newsletter arrived full of wonderful stamping techniques to try. Today I started with the zig-zag technique. I used Daisy Bucket scrapbook paper in combination with Stampin'Up! rubber stamps.

Thursday, August 6, 2009

Metal look

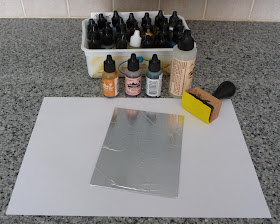
Als je geen metaal hebt en toch gecharmeerd bent van de metaal uitstraling, zou je het volgende kunnen doen:

If you like the metal look, but have no metail available and no tools, you might want to try this: 1. Neem een stukje papier (maakt niet uit wat) en haal deze door de Xyron. Heb je dit apparaat
niet, dan kun je ook dubbelzijdig plakband gebruiken (kijk hier ook:
1. Take a piece of paper (any paper is ok) and run it trough your Xyron. If Take a piece of you don't have this machine you can use double sided tape (take a look here:
2. Neem een stuk aluminium folie en leg dit op de plakkant van het papier. Druk het overal
goed aan.
2. Take a piece of aluminum foil and put it on the sticky side of the paper. Press well everywhere.

3. Kleur je aluminium folie met alcohol inkt.
3. Decorate your paper with alcohol ink.

4. Gebruik meerdere kleuren.
4. Use multiple colors.

5. Neem nu je cuttlebug en de door jouw gewenste embossing folder.
5. Take out your cuttlebug and the embossing folder you want to use.

6. Het resultaat als je papier uit de cuttlebug komt.
6. Here is the result when your paper comes out of the cuttlebug.

En dit is de kaart die ik er mee gemaakt heb. Papier van Club Scrap evenals de tekst. Het hart is van Michael Strong.
This is the card I made. Papers are from Club Scrap as is the sentiment. The heart stamp is from Michael Strong.

Sunday, August 2, 2009

Workshop

Heb gisteren in de winkel van Joan Gevaert een geweldige - hele dag - workshop gedaan. Werken met metaal, grungepaper en paper veneer techniek. Alles even leuk. Hier zie je het resultaat. Als je op de foto klikt, kun je alles van dichtbij bekijken. Yesterday I went to the shop of Joan Geveart and did a wonderful - all day - workshop. We worked with metal and grungepaper and did some paper veneer technique. Here you can see the result. If you click on the picture you can see it up close.