Pages

Wednesday, November 30, 2016

Club Scrap Paradise Blog Hop

Welcome to the monthly Club Scrap blog hop.
This month the kit is called Paradise.
I hope you have arrived here from
and seen her beautiful artwork.

If you happen to loose your way,
you can find all participants of the hop

Here is  surprise for you...what's in the bag?
Yes, I started with making a bag from printing out
the leaves design from the digital Paradise kit
on copy paper. Not on the heavy cardstock.
This is not good for folding and wrapping is usually thrown away.

I found on Pinterest how to make the bag
and by looking at this picture it was easy
to copy how to make a bag.
For decoration I used one of the cut
aparts from the paper kit. The flowers are
punched out and a few gemstones are added.
Closing the bag with a bookclip from my stash.
I have been playing with food jars (I have lots!)
and that is what  had to be wrapped up.
I started with making a snowblobe.
Using two pictures and glueing them back to back.
I laminated the picture, leaving a bottom
of an extra half an inch.
The lid of the jar is decorated with a border from 
the cut aparts from the paper kit.
The leaves from the rubber stamps are stamped
with dark green ink and colored with a water brush.
The picture is cut in 3 parts. The middle part
folded to the back and the two outside bits towards the front.
I used hot glue to fasten the picture to the lid.

Before adding the picture I added some
gold glitter inside the jar.
Here the decoration I added on the fron of the jar.
I must say it works best with hot glue to stick
everything to the jar.
The other jar I used to make a hanging element.
Make a hole in the middle of the lid for the ribbon
and print a picture. Oh my there are those boys again!
The picture is decorated with flowers that
were cut out after stamping and fastned with little
yellow brads from my stash. Rolling the picture
and taping beginning and end together.
At the top make some cuts  for glueing it 
on the lid. Through the lid you see the ribbon
that holds one of the buttons that came with the kit.
This is so that the ribbon won't fall through.
On top the parrot ( I thought this is quite appropriate:
they make a lot of noise all together), leaves and
flowers. The jungle is here!

But these boys are a bliss too. Love them to bits!

My last project is a card. This kit has such
happy colors it is perfect for a birthday card.

I used this sketch challenge for November
 from a Dutch stampgroup.

And colored my imgages with watercolor and a paintbrush.

Also this card qualifies for the last day
of the 30 day color callenge for 

Do you see that fun pinapple washi tape? I found it
today and could not resist using it on my card.
The flowers are punched out .

Well, this was my contribution,
but there is more. Go over to
and see her vision of Paradise.

Thank you for looking
and have a creative day!


Monday, November 28, 2016

Merry Mice for Hanukkah

Today I have been playing with a recent Stampin'Up! set
called Merry Mice. It is a set for Christmas and I have some 
fun cards made with it over at my other blog: 
This time I used the mice to make a Hanukkah card.

I added some Jewish elements to the mice. The candleholder
(Chanukkiah) is from the set Special Occasions and the
dreidl is made with a paper punch.
The mice are colored with pencil.

In the background I used the confetti textured impression
embossing folder (140592) and added 
mint macaron stamping ink.

The inside of the card is stamped with the chanukkiah stamp
again and the sentiment is from Create with TLC.

Thanks for looking
and have a creative day!


Sunday, November 27, 2016

Sunday Scrap Page: Wedding Anniversary


This week we went out to dinner to celebrate our 
17th wedding Anniversary. To make my page, I was inspired by 
the beautiful card I received from my good friend
Laura Holm (here her blog).

Laura made a beautiful background
and use the sweet heart rubber stamp

We had a delicious lobster dinner, a wonderful
cheesecake desert and of course coffee after in
a great bistro near our house.

Here more hearts that were inside the card
(was I lazy or what....)
and the sentiment is one from Club Scrap
as well as all the paper I used.

This I made with my beloved owl punch (I had seen
this image on pinterest and always wanted to do it).
The numbers are thinlits from Stampin'Up!.

Thank you for looking and have 
a very creative Sunday!


Saturday, November 26, 2016

Saturday Sketch card: Mojo Monday 475

My card sketch today is for the Mojo Monday blog
and of course for day 26 of the color challenge.
For this card I used some design papers from my stash,
the Michael Strong rubber stamp tree and a sentiment
from Club Scrap.
You find all the details of the 

As I stamped my image on kraft paper, embossed it with 
gold embossing powder and colored it with a white 
pencil and a white gel pen.

I added a few sticky pearls in kraft color to the tree

All the details of the colorchallenge can be found on

Thanks for looking
and a have a creative day.


Club Scrap Christmas Thyme Blog Hop

Welcome to the Garden Shed Holiday Blog Hop
with inspiration for your  Christmas cards
and projects for 2015 with the digital

Hope you have arrived here from
and seen her beautiful artwork.
If you happen to loose your way you
can always go back to the

I came up with two projects for you:
a pop-up card and a decorative tree stand.

I found a wonderful tutorial on the Splitcoaststampers
for this free standing pop up card HERE
There is also a video. It is quite easy to make
and you can flatten it for sending.
Picture I made at a flower show last week
for inspiration,

As it was to late for sending me the real set with
papers and stamps, I used papers I had and the
digital images of this Christmas Thyme kit. 
It combined perfectly with the paper I still have 
from the Crewel & Unusual kit. 
Here you see the flattened version of the card.
The tag is inside the card and moves upward and
out when you fold the card open.

Sideview of the card and popped up tag.

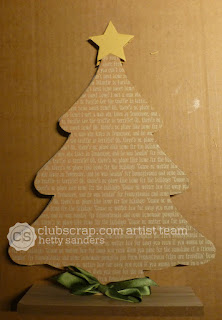
My next project is this wooden tree. I found it at my favourite
dollar store and had right away the idea of covering it
with printed Christmas Thyme paper. I printed the 
papers on ordinary copy paper, which is wonderful for
glueing to the wooden tree. A little extra yellow from
the Crewel & Unusual papers for the star on top.
Start by tracing the tree on the backside of the
printed paper and cut the two pieces (front and back)
at the same time.
With Club Scrap bookbinding glue the papers
where fasted to the tree.

Even without decoration the tree looks beautiful.
So here are some of the printed images I have
used to decorate the tree. I colored the images
with pencil.

On one side I used  the thyme wreath
and inside i stamped a wish from an older set.
(I just had to stamp something!) and
at the bottom some of the pinecones colored
with a white pencil.

And on the other side with a large sentiment.
On the star on top I added a gemstone on
both sides. I finished it off with a green
ribbon on the bottom of the tree.

Now it is thyme to hop on and see what
the wonderful Wendy has on her blog for you.

Thank you so much for looking
and have a creative day!


Friday, November 25, 2016

Ctlc Quick Christmas Cards

Today I am in need of a few quick Christmas cards
and for this digital images with only a little coloring
are perfect. For these cards I used the christmas tree
by Create with TLC and 
a sentiment from Stampin'Up!.
Just some designers papaper and 2 markers and a
white gel pen was all that I needed for these cards.
Here you see the result and I even added a few sticky gemstones
to make the card more Christmassy.

They are so easy to mae, so once I get everything cut and 
the trees printed and colored, I had a bunch done today.

Of course, even though there is just a little coloring,
this card is for day 25 of the color challenge on

Thank you for looking
and have a creative day!