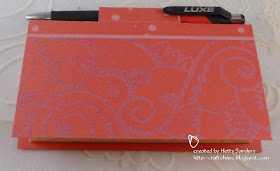
Today I have a tutorial for you
on making a notepad with a pen.
Stamps used are by Club Scrap
and Michael Strong.
You can make this for any size of notepad
you want to use. To know the size op paper, you
measure the width and the length.
Take the width twice and add 1,5 inch.
The length you keep the same.
For this tutorial I used a post-it notepad of 3,25 inch
in width and 5,5 inch in length,
so I took a piece of cardstock of
in width and 5,5 inch in length,
so I took a piece of cardstock of
8 x 5,5 inch. Double sided tape, scissor, pen and
ruler.
Dutch translation:
Benodigdheden:
post-it blokje van de action gebruikt
Dutch translation:
Benodigdheden:
post-it blokje van de action gebruikt
en dat is 12,7 cmmx 7,5 cmm.
Het basis papier 20 x 14 cm.
dubbelzijdig plakband
schaar,
potlood, liniaal
pen
versiering voor bovenop geheel naar eigen keuze.
Het basis papier 20 x 14 cm.
dubbelzijdig plakband
schaar,
potlood, liniaal
pen
versiering voor bovenop geheel naar eigen keuze.
Start with scoring (you can use a score tool)
3,25 - 3,75 - 4,25 inch
Ril het papier in de breedte op 8,5 cm - 9,5 cm en 10,5 cm
vanaf de rechterkant.
Het eerste stuk aan de rechterkant,
is de bovenkant van het blokje.
Ril het papier in de breedte op 8,5 cm - 9,5 cm en 10,5 cm
vanaf de rechterkant.
Het eerste stuk aan de rechterkant,
is de bovenkant van het blokje.
For the pen holder we are going to cut
between the scored lines. I measured a one
inch holder in the middle of the notepad.and
draw the lines with a pencil.
Om de pen in je blokje te kunnen doen, maken we twee
lijntjes over de gerilde lijnen. Zoek het midden op (7cm)
en aan weerskanten een lijn op 2,5 cm.
Knip dit in met de schaar.
Om de pen in je blokje te kunnen doen, maken we twee
lijntjes over de gerilde lijnen. Zoek het midden op (7cm)
en aan weerskanten een lijn op 2,5 cm.
Knip dit in met de schaar.
Cut on the pencil line with your scissor,
Add double sided tape on the side of the score
lines closes towards the larger side (this is the back).
Don't add tape where you have cut.
Plak nu dubbelzijdig tape dichtbij het grootste
vlak (dit is de achterkant).
Plak geen tape op het middenstuk, daar komt de pen.
Plak nu dubbelzijdig tape dichtbij het grootste
vlak (dit is de achterkant).
Plak geen tape op het middenstuk, daar komt de pen.
Glue that side towards the backside of the notepad holder.
Plak het geheel naar de brede achterkant.
Vouw de pennenhouder naar buiten.
Plak het geheel naar de brede achterkant.
Vouw de pennenhouder naar buiten.
Fold the penholder outwards. This is how it looks now.
Glue the post-it notepad inside the holder.
Plak het post-it blokje nu op de achterkant,
stop de pen in de houder
en versier de bovenkant naar keuze.
Plak het post-it blokje nu op de achterkant,
stop de pen in de houder
en versier de bovenkant naar keuze.
Put the pen in the holder. Now you are ready to
decorate the top side of the note pad.
You can just add decorated paper or
decorate with a stamped image.
Here another notepad with Club Scrap papers and stamps.
On top of the notepad I did a technique called
cracked glass.
You can find a tutorial for this cracked glass technique on
Have a creative day!


Great project!! Love how it turned out! Thanks for the tutorial.
ReplyDeleteGreat projcet - I will definitely be doing some of these.....thanks. I must have missed this on SCS
ReplyDelete:)
Thanks Hetty! Cute image for a little gift and so pretty the way you stamped the front of this.
ReplyDeleteLynn
Beautiful! I like both versions. Thanks for the tute!
ReplyDeleteWow, Hetty, great tutorial. Such a wonderful gift.
ReplyDeleteWhat great idea and gift, Hetty. Thanks for sharing. I'm going to give it a try this weekend.
ReplyDelete