Every year I receive these free
calendars from our garage and they
are wonderful to decorate to your
own liking.
(if you don't get them, you can also
buy them rather cheap in the bookstore)
The calendar part usually is pnly fastened
to the back with 2 stapels. So after opening
these, you can take this part of and
put away until the end.
(Just don't forget to keep the holes!)
The back of the calendar is now ready for decorating.
You can paint it, decorate it with one
piece of (scrap)paper or like I did with a
few pieces of decorated paper.
When i had them all gluied to the cardboard
I used a little gesso over the top, to soften the color
and to make it easier to stamp on.
Around the border I added some vintage distress ink.
For the top of the calendar I used the Stampin'Up!
pendant punch, an oval punch
and Michael Strong's oval Numbers
and Cloisonné Cranes
and a word stamp.
You can see I embossed all the stamps on different papers
and cut or punched them out before arranging
it on the back pannel.
I went on by stamping a little
on the background using some Tim holtz stamps
and a circle stencil to give it an overal look
like it was one piece of paper.
On the bottom iI added a strip of one of the
long tim holtz die cuts.
Then I stamped Michael Strong's new little elephant stamps
a few times on dark grey paper to have them on the bottom
underneath the calendar. I also stamped one large elephant
to be the head of the heard.
I did not like to have just something on the top and bottom, so
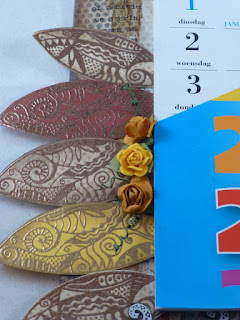
leaves were stamped, embossed and cut out to go
along the calendar.
After aranging everything like I wanted it,
I glued everything to the cardboard
and it was time to add the calendar again.
Open the stapels real straight and
have them go through the holed front to back.
Close the staples on the back with plyers or screwdriver.
Now your calendar is finished and just have to
wait a month to hang it and start using it.
A close up to the bottom with the elephants.
A close up to the leaves and the flowers I added.
Hope i have giving you some inspiration.
Have fun playing!
Have a creative day!


Hetty, your new 2013 calendar is FANTASTIC!! I LOVE LOVE LOVE it! Thank you for the creative tutorial!!!
ReplyDeleteJe kalender waar je afgelopen zaterdag op de Stamping Angelsdag/-reünie mee bent begonnen, is mooi geworden Hetty.
ReplyDeleteLeuk dat je het thuis ook hebt afgemaakt. Nog even geduld voordat je het kunt gaan gebruiken.
Leuk dat je op de Stamping Angels reünie erbij was.
Groetjes van Yvon
Heel erg mooi geworden. Groetjes Ineke
ReplyDeleteHetty, this is as fabulous as I suspected after the sneaky-peek you gave us :) I love it.
ReplyDelete