Here is my next blog post for the
You can link your card to the hop too.
You find all the details here.
Today not a card to share,
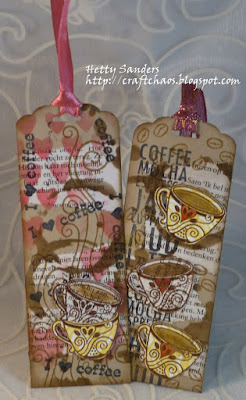
but a bookmark,because
I love reading and especially when the weather
is nice and I can sit with my coffee and a book
in the garden. After my vacation to Italy I am reading:
The House by the Sea by Santa Montefiore.
I made two bookmarks, one for me,one to give away!
Solet me know which one you would like!
For some directions:
the bookmark is 2 x 6 inch.
This scalloped tag topper is perfect for a bookbark.
This way you have a great top and a hole for a ribbon.
Take some book paper and a glue stick.
Tear the paper into fun pieces.
Glue the pieces op bookpaper
onto the bookmark.
Decorate the bookmark with a stencil of your choice.
this is how it looks after using one stencil.
And I used another coffee stain stencil.
Both stencils are by Tim Holtz.
Now it is time for stamping.
The stampset i used is the Coffee Stamp Set
by Michael Strong.
For the background I stamped with the
coffee steam stamp.
Then i used only half of this sentiment stamp
(from my stash)
On the other bookmark,I stamped some SU! coffee beans and
a Club Scrap sentiment from the kit Brewed Awakenings 2012
Now stamp and emboss the smallest of the coffee stamp
fromthe Michael Strong set. And then cut them out
with scissors and glue them to the bookmarks.
So this is the finished bookmark
with the hearts
and here is the finished bookmark with the
Club Scrap sentiment.
I think I go back to finish my book!
Hope to see you again tomorrow.
Have a creative day,


Fabulous bookmarks, Hetty! Thank you for showing how you made them - I don't have that punch but I think I could do something similar with partial die-cutting so thanks for the tip! As for the bookmarks, my favourite has to be the pink one with the hearts! Thank you! Always enjoy your coffee creations!
ReplyDeleteI like this Hetty! What a great idea for a bookmark! I love to read and usually have a beverage next to me whether coffee, tea or other. This would make a great gift tucked into either a book or with a gift card for coffee. I imagine you could make a pocket in the back of the book mark to hold it (maybe not wide enough) or inside a greeting card that matches the bookmark). Diana Craig
ReplyDeletetime to get out my MS stamps and use them!
Wonderful bookmarks. Thanks for the great tutorial.
ReplyDeleteSuch gorgeous artwork on both of your bookmarks, Hetty! Love your use of torn book paper and how you put all the elements together so beautifully!!! You are a true artist!!! Thanks for sharing your creativity with us!
ReplyDeletesoooo Cute!!! Thanks for the tutorial:)
ReplyDeleteSuch pretty bookmarks!
ReplyDeleteoh Hetty, this is just way, way cute. Must copy. Thank you!
ReplyDeleteBeautiful bookmarks, Hetty, I love all your stamped layers, so pretty! Happy hopping!
ReplyDeleteAs a fellow reader I can appreciate your pretty bookmark and I LOVE that stamp set!
ReplyDeleteBeautiful bookmarks. I love the mixed media approach you used. TFS
ReplyDeleteawesome bookmarks..love the backgrounds..
ReplyDeletethose are fabulous bookmarks !
ReplyDeleteBoth of your bookmarks are gorgeous! Love the layered book print paper and then the steam and adorable cups! I love the pink one with the hearts!
ReplyDeleteWhat fun bookmarks! I've never seen that paper punch before!
ReplyDeleteThanks for playing with us over at the Summer Coffee Lovers Blog Hop♡
Oh what fab bookmarks! I immediately thought, "I want one!" then you offered one as blog candy... how sweet! I like them both, but would choose the one with the Club Scrap sentiment first. Thanks for the chance!
ReplyDeleteFantastic bookmarks! And thank you so much for showing us your process. You've made it look so easy to do too! Really pretty and also really useful for all of us readers out here. Just great! Bev
ReplyDeleteCute bookmarks! It's fun to see your layering process!
ReplyDeleteThere are so many good sentiments going on here - first that great image, then the coffee cup! I am a HUGE reader and a HUGE coffee lover so I think your project is super fantastic. Thanks for sharing your process, too!
ReplyDeleteBeautiful bookmarks you made!
ReplyDeleteGorgeous bookmarks! Thank you for sharing step by step photo tutorial. :-D
ReplyDeletefun tags, loving all the elements!
ReplyDeleteGorgeous bookmarks! I love the beautiful backgrounds you created, thanks for sharing the steps!
ReplyDeleteWow mooie boekenleggers hoor en leuk dat je het hele proces zo uitbeeld, gaaf, gaaf.
ReplyDeleteThat quote is awesome! Love your gorgeous bookmarks!! I bookmarked your post for future inspiration, your work is stunning!! Thanks for sharing! ~Annie
ReplyDeleteLove your coffee bookmarks!
ReplyDeleteBeautiful mixed media project! Love the colors and those adorable coffee cups. Also love the use of the newsprint. TFS!
ReplyDeleteawesome bookmarks!
ReplyDeleteso cute! its amazing how many stamps and layers are on those bookmarkers and they turned out adorable
ReplyDeleteOh my! LOVE these bookmarks! Beautiful and thank you for the walkthrough ♥
ReplyDeleteFabulous bookmarks, so fun. Love the opening comment, so true, lol.
ReplyDeleteThese bookmarks are fabulous!!! Thanks for the step out pics. I love seeing how people create their projects.
ReplyDeleteHi Hetty!! ohh thanks a lot for sharing the step by step of your both great tags!!! TFS!!!
ReplyDelete