Tuesday, February 28, 2017

Club Scrap Artist Team: Alphabet Stencils

On the last day of this short month
Artist Team has some stenciling for you.
All of us share with you ideas of how
you can make use of the letter stencils.
The start of the blog op is at the
Club Scrap Blog
and you can see there not only the
list of all the participants, but also
that the stenicls are 50% off!! YEAH!!
You find the stencils HERE.
 Lower Case

or Upper Case? Or both!

Hope you have arrived here from
Pam's Blog
and are now in for more ideas.

I have made a scrapbook page and a card for you.
For all my projects I used the Club Scrap
February kit Succulents that was still on
my table from the blog hop. Hope you had a
look at all those fabulous projects here.
The scrapbook page has pictures from last Sunday,
when it was my youngest daughter's birthday.

I used 3 colors of ink for my page: ruby, onyx\and moss.
With these 3 colors i colored the name of my daughter.
I used post it notes to comer other letters, so I would not
smidge the page on wrong spots.

This is how it looks after coloring all the letters.

And this is how it finally looks on the scrapbook page.

For the background on the page, I used some of the
cut apart strips and made this weave on the page.

I put tape only on the edges, so I could weave them in the middle.

Then I used one of the stencils to create a fun background.

And you see I did the number the same way as the name.
Do you notice the coincidence of the date and the age?
It can only happen once in a lifetime!

The cut aparts had also these fun 1" circles that I cut out
and used as a kind of flower and decorated with
 a few sticky gemstones.
I just love my Succulents kit and could
not resist ajusting my plants and make
a matching card. So how about one
with the alphabet stencil.
And this is my card idea:

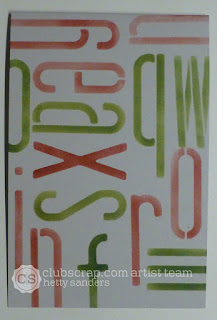
creating a background with the letter stencils
by using the letters as a decorative element. 
Also on top using one of the succulents rubber
stamps. The outline is drawn with a black micron
marker, to make the text stand out.

These are some of my ideas, but there are many more
and Jennifer is sharing hers on her
Thank you for looking
and have a creative day!


Monday, February 27, 2017

Cupcake Inspiration 396: Catz

As I had my cat stamps out for making the birthday card
for my daughter (see yesterday), I noticed the
challenge on the Cupcake Inspiration Blog
was cats, so here my card.
Cupcake Inspiration Blog with all the details
can be found here.

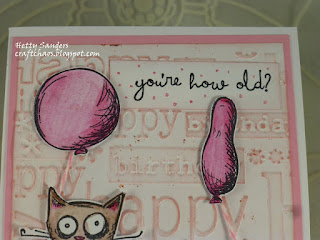
This time I made the background with an embossing folder
and added some pink ink to the raised parts of the 
embossed paper. It is a Happy Birthday embossing
folder. A birthday card is always good to have ready.
The balloons as well as the cats have been coloured
with aquarel pencils and a waterbrush.

For this card i used the larger Crazy Cats by
Tim Holtz, here colored chocolate brown.

Thank you for looking
and have a creative day!


Sunday, February 26, 2017

Happy Birthday Zora

Today is the birthday of my youngest daughter Zora.
These are some early pictures of her.
She now is a wonderful young woman with lots
of ambitions in life and I wish her all the luck in the world.
May all her dreams come true.

Of course i made her a birthday card
and I used Tim Holtz mini crazy catz
for the card.

The background is colored with the use of afew
different stencils, a belnding tool and pink,
red and brown ink. On top the garland is drawn
by hand and than the fishes are stamped hanging
from the line. The sentiment is from the matching
word set from Tim Holtz called Crazy Talk.
The balloons come from the set Crazy Things.

The balloons as well as the cats are colored with
aquarel pencils and a waterbrush, then cut out and
added to the background with foam tape.

Why cats? Well these are my daughters cats: Droopy and Lucky.
I hope she will have a wonderful day!

Thank you for looking
and have a creative day!


Saturday, February 25, 2017

Saturday Sketch card: missing Stella

This card is made for Michael Strong,
because he had to put down his cat to sleep.
This ca was imortant, for she was the inspiration
for this lovely cat stamp.

I used the sketch of the 
as an inspiration for the card.

The car is embossed with silver embossing powder
and colored with aquarel pencils. Fisishing it of with 
a few sticky gemstones.

Here a few pictures of Mike's cat.
And here only a few od the card I made with this wonderful stamp.

I am sure Stella will be missed greatly.

Thanks you for looking
and have a creative day.


Friday, February 24, 2017

CAS color challenge #211

Here I am again with the Beautiful You set


I used this CAS Color challenge 
and all the details are here.

The paper in the background is from an older
Stampin'Up! design paper block and perfect
for this challenge. The center image is cut with 
the new stitched framelits from SU!. The flower
and brad are from my stash.
The ruched ribbon in peekaboo peach was first
tied around the backpanel and then the sentiment
was added. it was cut with the smalles oval shape
of the stitched frames.

Thank you for looking 
and have a creative day!


Thursday, February 23, 2017

Twin card

This card is made with a digital image called
It is for a progressive challenge.
The sentiment is by Create with TLC.

Right away when I saw this little boy it
made me think of the twins (my grandchildren of 1,5y).
So they are the inspiration for my card.

I colored the image with photoshop and printed 4 little boys.
2 I used for more dimention. I cut out the hat and the pj's
and added it with foam tape to the card.
The background is a piece of design paper from
my stash. The card is finished off with a ribbon
and some sticky pearls.

And here is the inside of the card with another 
Create with TLC sentiment and printed little
boys and a left over piece of design paper.

Thank you for looking
and have a creative day!


Wednesday, February 22, 2017

Club Scrap Febuary Blog Hop: Succulents

Welcome to our monthly blog hop
and I hope you have arrived here from 
and seen her wonderful eye candy.

If you loose your way in the hop, you
can always find all the participants on the

The kit for Febuary is called Succulents:
Here you see the colors of the kit and how many 
scrapbook pages you can make out of it if you
use the ALSB (assemblyline scrapbook) method.
Online you can download all the instructions and
cut as is written there to get all the pages.

So here is one of the pages (if you look at the 
instructions it is layout 3). My dh and I went to a spa
2 weeks ago. We got this as a present from his work.
He worked there for 40 years. We had a great time!
I handlettered this on the paper and it says exactly
how we felt. 
Not only is the paper great for scrapbook pages,
it is also wonderful for making cards. The kit
also comes with a great set of rubber stamps.
Visit the Club Scrap store and have a look at the
Jumbo, Art Nouveau and Greetings unmounted
rubber stamps.

For my card I used the Jumbo stamps. This kind of
card is called a center step card and there are instructions
all over the web. I do have the template here for you:


Cut and fold as the template shows and you get
this free standing card with a platform in the
center that is perfect for decorations.

As this kit is ful of plants, of cource this card
gets a pot with one of the succulents and when 
you pull the plant out of the pot it has a sentiment
stamped on the card inside the pot.

And now for my cutest project:

If you have been following my blog, you
might have seen these food jars also for 
Valentine. I was inspired after seeing
this project on the blog of Tim Holtz.
I made love jars for my daughters and my husband,
but the suddenly I got this idea with the 
succulent inside the jar.
And with some perfect pictures of 
the twins I got to work.  
So cleaning the jar, spraying the lid gold
and having a handy husband to make the
hole in the lid and find the right hardware
in the garage (he alsways has the right stuff I need).
Inside the jar I made a tiny flowerpot with
the dark red paper. Inside there is some quick
drying clay in wich  I added the succulent
(it is not a real one). Around it I added a few 
tiny grey stones for balance. Around the jar
I added one of the cutaparts that I stamped
with red and the word love. I used double sided
tape to glue this strip to the jar.
For my card I used one of the photo mats
that came with the kit and folded it in half.
For decoration I used parts from the
cutaparts that also come with the kit
as well as a bag of buttons.
You find the cut aparts here.

Here is the card from the inside.
All the sentiments are just perfect. Club scrap
always knows what I need!

And finally I have a box for you.
I found a video tutorial and
thought this is perfect for this paper.
I love the shape! Great gift box.
You need your envelop punchboard./
You find the turorial here:


It is a great box for a little sweet gift.

So, enough ideas...no...want more?!
Well, hop over to
Pam's Blog.
and see what she has come up with.

Thank you for looking
and have a creative day!