Thursday, November 30, 2017

Cupcake Inspiration 433 for Christmas

It has been a while, but today I have been using the
Cupcake Inspiration for my card.
I used:
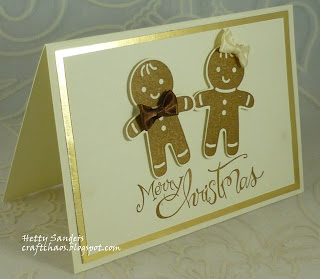
Stampin'Up's Cookie-Cutter Christmas with matching punch
and the Sassy Salutations fet for the sentiment.

Here you see the challenge of the
It is a color challenge.

The card is cream colored as well as the front panel
and in between there is gold paper.
The tiny ribbon bows came with my Trattoria
Club Scrap kit and are perfect for this card.

Thank you for looking
and have a creative day!


Wednesday, November 29, 2017

Club Scrap November Blog Hop: Trattoria

Here we are today with the monthly
Club Scrap Trattoria Blog Hop
for November. Sharing with you ideas what to do with your
pizza box of paper and stamp goodies.

You find all the participants on the main
Club Scrap Blog, but I hope you have arrived here from
and seen what delicious work she had for you.

When you have been hopping, you must have noticed
that the Artist Team will stop existing and that
for next year there will be other ideas of sharing 
inspiration with you. Even though I will not be stopping
sharing my ideas with you, I want to THANK Tricia and 
Karen for the opportunity to be on this team
and being able to play with so many of the wonderful
goodies each and every month. I have loved the
challenges we were set and sharing ideas with
the other members of the Artist Team. 

I absolutely love the ALSB instructions, to get the most out
of the papers for scrapbooking, so I just had to do a spread.
As I do eat pizza, but never made pictures of it, now I needed
to do so for my pages this month.
On Tuesday we have the grandchildren all day.
The twins come early in the morning and the older brother
comes after school. When they go home, we are tired
and I do not feel much like cooking. We discovered New York 
Pizza has special Tuesday deals, so Tuesday is our 
pizza day now: double pepperoni and New York.

I love the moustache on the stencil that came with this kit, 
especially because my Ray has one :-)! 

I also wanted to make some cards and here are 3 cards
I came up with:
For these cards I used some letter dies (Stampin' Up!).
Lately I seem to see a lot of cards using big lettering.

Card #1 is an oblong card (8"x 4"), with no stamping involved,
just the paper, ribbons, love charm and cut apart from the kit.

Here a close up to some wonderful detail of the card.
The wonderful word charm on the ribbon and do you
see the great decorated paper through the cut out lettering?!

Card #2 is a bridge card that I really like now.
For a bridge card you use the 8,5"x 11" piece of paper
and cut it vertical in half and make the papers
I add the intructions here from the Orchard colection 
with all the scoring details.

The pizza letters are the ones I cut out of the panel
on card #1. The pizza's are from the digital kit
and colored in photoshop.
Inside the card I stamped one of the fun sentiments
from the Trattoria Art Nouveau unmounted rubber
stamps and glued some pizza pieces to it as well.

And because Christmas is near and the colors of this kit
are also great for Christmas cards I made this one as well.
Pizza delivery from the North Pole is card #3.
In addition to the Trattoria papers I had two gnooms
left and used Scandinavian Holiday Jumbo stamps.
The sentiment on the front is printed with the computer.


Inside the card I stamped a few Christmas baubles
in green and a sentiment in red. I used the same digital
pizza's as on card #2.

More Christmas cards we will be sharing on 
December 11, when some of us have put together
another blog hop (we just could not resist!!)

And because this is the last post with the team
I made a little more than usual.
When asking for pizza, how about another pizza box,
but not the big size, just a little one.

This little pizza box is 3,5"x 3,5" and  made by SU!.
For the top of the box I used the printed pizza colored
in photoshop. Behind the pizza the colors of the Italian
national flag. Behind the pizza a scalloped circle cut
with a spellbinder die. I love the fork charm that came 
with this kit and added it on top of the box, fixing
it with a little glossy accent glue.

Around the box I used some of the cut apart strips
ans stamped some of my own with the little pizza
slice in red ink.

And now for the inside of the box: it holds 4 small
cards 3x3 inch and matching enveloppes.
i made the enveloppes with the enveloppe punch board.

For the cards I used some of the cut aparts in combination
with sstamping, ribbons and more pizza.

Just some fun and silly cards. You never know when you
need some?!

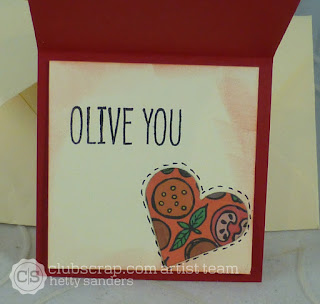
And of course i could not throw away the little 
cut out heart and used it inside the card with
another stamped sentiment.

Well, sigh, this was it!
Hope you have enjoyed all my posts for Club Scrap
and got some inspiration out of it. 
Next for her last post go to
and see what yummy artwork she has for you.

Thank you so much for looking
and have a creative day!


Sunday, November 26, 2017

Pinspiration: Christmas

Today I share a card with you that is inspired by a card
I saw on Pinterest.  And I love  the endresult, for I am
sure I am going to make a few more of these. I am a fan
of  kraft look.

For the background I stamped the semtiment with
vintage distress ink . Then I stamped the sentiment 
on a seperate piece of kraft paper  in black.

Next  a piece of musical paper (SU!) is cut of 2,5"x 5,5"
and glued to the background.
On a piece of white paper Michael Strongs middle size
Christmas Tree is stamped with peeled paint distress
ink and cut out with an oval die.

Then I cut a piece of vellum with a slightly larger
oval die and used a snow embossingfolder.
First i taped the christmas trees on the card
and next the piece of vellum on top.

The kast thing i added was the sentiment.
This sentiment is one of my favorites.
It is from an old SU! set called Sassy Salutations
(not available anymore :-( ).

Thank you for looking
and have a creative day!


Saturday, November 25, 2017

The Christmas sweater card

Now that Thanksgiving is over, all eyes are 
on Christmas: shopping, handmad gifts, cards
and food.

Today I go for some card inspiration
with Michael Strongs small Christmas Tree stamp
and the Mosaic Frame stamp.


You all know the ugly Christmas sweater
and that is the inspiration for my card.
Here I share the template so you can make
your own ugly sweater card.

I started with cutting the sweater and used 
the Stampin'Up! Cable Knit embossing folder.
I added some red ink and used a red marker
to draw the borders of the sweater.

The tree is stamped on red paper and embossed in white.
Then with a white pen I drew the stiching before
cutting out the image and adding it with foam tape to
the card.

On top and bottom of the card you see part of the 
Mosaic frame stamp embossed in white on red paper too.
The sentiment is from the Words stamp set.

Thank you for looking
and have a creative day!

Friday, November 24, 2017

Club Scrap Artist Team Challenge: 3 of a kind

The challenge for the Artist Team this month
is to create  a card, page or project with elements from
three different kits. So what to come up with this time.
Then I wanted to make something to thank (it was
thanksgiving yesterday and I am thankful for being part
of this Artist Team) Tricia for the wonderful
opportunity to be part of the team and to thank
Karen for all the work she does for us, so how
about a thank you in a pocket letter!

You can read all about it this challange on the main
Club Scrap Blog and see all the names of
the members of this wonderful Artis Team HERE.

For  I hope you have arrived here from
and seen what great inspiration she had for you this time.


For this pocket letter I used 3 different kits:
Adirondack
Succulents
Pure & Simple
Each row of three cards is made with the stamps
and papers from the same kit.

The first row is Adirondack. You also see on the
left the word "love" which is from the November kit
Trattoria. It works so great here to make Love Club Scrap.
The big letters are cut with SU! letter framelits.
The stamped ducks are cut out and interwoven with the letters.

The 2nd row is made with Succulents papers and stamps.
You see here a strip of paper all across the three pockets.
Thanks is stamped with versamark and gold embossed.
The plants are colored with watercolor zig markers.
Here the 2 cards that are behind the strip of paper.
In the middle of the cards there is not much interresting,
just an open space so the strip belongs to the cards.
For the last row of cards I used the Pure & Simple papers and stamps.
For each card I stamped on the designed background with another
design and the go so wonderful together. Some leaves are 
intertwoven with the letters.

If you are interrested to see more pocketletters, it was one of the 
post we did together and you can still see it HERE.

And now it is time to move on and see 
and what she has in store for you.

Thank you so much for always 
visiting my blog and leaving
all your wonderful compliments.

Have a creative day!


Thursday, November 23, 2017

Happy Thanksgiving!

Today it is Thanksgiving in America and with this
card I want to wish you all a very 
Happy Thanksgiving!

I am so thankful that through my cardmaking
and scrapbooking I made so many friends all
over the world. Not only through cyberspace,
but also meeting a lot of you in real life.
Thank you for being my friend!

I made this card with papers of Club Scrap,
a coffee cup die by Tim Holtz and hear, chick and 
fan stamp by Michael Strong.
I want to enter my card in the 
food/drink challenge this week on the

Thank your for looking
and have a lovely and creative day!


Wednesday, November 22, 2017

18th Wedding Anniversary

As today is our 18th wedding anniversary
I made this card as loving my husband is so delicious!!

I used the digital Club Scrap Trattoria kit
and found the heart shaped  pizza online.

And as I made top 3 last time (Yippee!) on the 
Sketch Saturday Blog I had to make another 
sketch card.


Cheers, my darling,
to many more wonderful years!