Showing posts with label lesje. Show all posts

Thursday, November 18, 2010

Lesje/ Tutorial

Op Splitcoaststampers is elke week een nieuw lesje.
Gisteren was het zo'n leuk en eenvoudig lesje, dat ik daar deze kaart mee gemaakt heb.
De letters  en de ster op de achtergrond zijn van Michael Strong en het meisje is van Magnolia.
Hieronder zie je het lesje van Splitcoaststampers en legt heel duidelijk
uit hoe je deze achtergrond maakt.
Voor de letters heb ik ook deze achtergrond gemaakt en
daarna met vesamark erop gestempeld en blauwe embossingpeder gebruikt.
De letters zijn uitgeponst met een ovale pons van ek succes 1 1/2"x 3/4".
Het meisje is ingekleurd met een waterbrush en disstress inkt.


On Splitcoaststampers they have a tutorial every week.
Yesterday there was a new lesson, that looked so fun and easy, that I made this card with it.
The letters and the star in the background are by Michael Strong and the girl is by Magnolia.
Here you see the video tutorial by Splitcoaststampers and it it explains the technique for the background very well. For the letters the same background was made and the letters were stamped with versamark and than embossed with blue embossing powder. I used an oval ek succes punch 1 1/2"x 3/4"to punch out the letters. The girl was colored with a waterbrush and disstress ink.

Have a creative day!

Sunday, September 26, 2010

Spinneweb/ Spiderweb

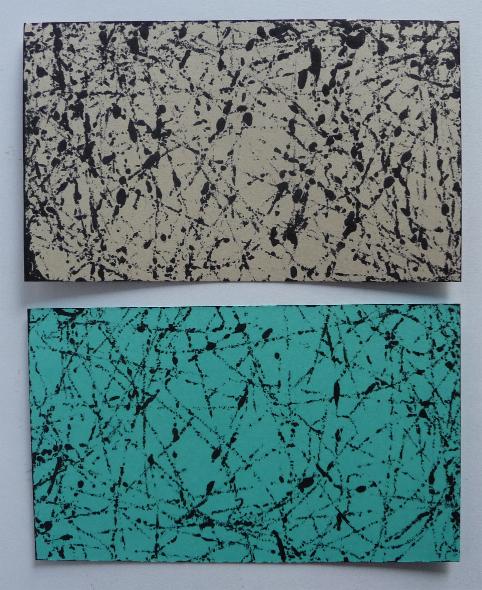
Deze kaart is gemaakt met de spinneweb techniek. Echt een leuke technique voor deze tijd van het jaar.
Hieronder vind je de uitleg.

This card is made with the spiderweb technique. A fun technique for this time of the year. Below you find instruction.
Wat heb je hier voor nodig?
een goed sluitend plastic doosje, een refil flesje zwarte inkt, een stuk of 5 grote maat kralen of knikkers , een rolletje plakband en wat papier dat op de binnenmaat van het doosje gesneden is.

What do you need?
aplastic box that closes real well, a bottle of black refil ink, about 5 big beads or marbles, a roll of ordinary cellotape  and some paper that is cut to the inside size of the box.
1. Doe nu de kralen in de plastic doos en een aantal druppels zwarte inkt.

1. Put the beads in the plastic box and add a few drops of black ink.
2. Vervolgens sluiten we de doos af en gaan schudden, maar alleen zo, dat de kralen alleen over de bodem van de doos rollen!

2. Now we close the box and start shaking the beads, but only make the beads move at the bottom of the box!
3.Zet het doosje nu op tafel en neem het plakband en het papier. In het midden van het papier plak je een opgerold stukje plakband.

3. Put the box on the table and take the cellotape and your paper. Roll a piece of cellotape and stick it to the middle of the paper.

4. Plak het papiertje nu aan de binnenkant van de doos. Doe dit aan de deksel die nog schoon is.

4. Stick the piece of paper on the inside of the box. This is on the cover of the box, the clean side.
5.  Nu gaan we weer schudden, maar draai dan wel de doos om en schud zo dat de kralen over de deksel rollen. Dus over het papier.

5. Now we are going to shake again, but first turn the box and make sure the beads roll over the cover of the box. So they roll over the paper.

6. Kijk eens wat een mooi web je krijgt.

6. See how beautiful the web is.

8. Je kan het op allerlei verschillende kleuren papier doen. Na afloop kun je de doos en de kralen gewoon onder de kraan afspoelen.

8. You can do this technique on all kinds of colored paper. When finished you can clean the box and the beads with water.
Hieronder nog een voorbeeld van een scrap pagina. Papier is van Club Scrap (Arts 'n Crafts) en de octagon stempels van Michael Strong.

Here another sample, but this is a scrap page. It is done with Club Scrap (Arts 'n Crafts) papers and the Michael Strong octagon stamps.

Thursday, August 5, 2010

Gevouwen kaart/ Folded card

Vandaag heb ik weer eens een lesje. Ik had ineens een leuk idee. Het is vast al eens ergens gedaan. Je hebt nodig vier papieren van dezelfde maat ( Ik heb hier gekozen voor 10x10cm) en 1 papiertje ietje groter (11x11 cm). Natuurlijk ook stempels of plaatjes, maar de decoratie kun je naar eigen inzicht kiezen.
Verder een score-pal (of score-it, maar het kan ook zonder!!) en lijm of dubbelzijdig plakband.

Today I have a tutorial for you. Suddenly I had this idea. I am sure it has been done somewhere. You need four square pieces of cardstock ( I used 4x4 inch) an one piece a little bigger ( 4,5 x 4,5 inch). And for decorations you can use stamps or pictures, but I leave that up to your taste. Also you need a score-pal (or score-it or you can even do without it!!) an glue or double sided tape.
 

1. Vouw of score alle  10x 10 cm vierkante papieren precies 1x door de helft.

1. Fold or score all 4x4 pieces of paper 1x exactly in half.
Het ziet er nu zo uit:

It all looks like this now:

2. Neem nu 1 gevouwen vierkant en leg daar de tweede in een hoek van 45 graden in. Neem dan de derde en doe daarmee hetzelfde. Leg hem in een hoek van 45 graden in nummer 2. Nu het laatste vierkant. Deze gaat 45 graden in nummer drie en van zelf in nummer 1. Kijk goed naar het plaatje. Ze liggen op en over elkaar.

2. Take the 1st folded square and lay the 2nd one in there on a 45 degree angle. Now take number 3 and also lay it in number two on a 45 degree angle. Numer 4 goes in number 3 on a 45 degree angle and will fall automatically in number one. The are up and over each other. Take a good look at the picture.

3. Plak dit op het overgebleven velletje van 11x11 cm en sluit dan ook de bovenste laag op en over elkaar.
Als je het leuk vindt kun je er nog een lintje tussen plakken (zie het eindresultaat).

3. Glue this on the 4,5x4,5 inch piece of paper that you had left over. Now close the top also by putting the paper up and over each other. If you like you can add a ribbon befor you glue it (see the end result).

4. Het is nu aan jou, hoe je de caart wil versieren. Als je de kaart weer open vouwt kun je daar een kaartje met een tekst of wens in doen. Ook achterop kun je nog schrijven.

4. It is up to you how you want to decorate the card. If you open the card again, you can add a wish or a saying in there. You can also write on the back if you want.

Als decoratie op de kaart heb ik de mini bloem stempel gebruikt van Michael Strong (geembossed in goud) en uitgestansde blaadjes. Binnen in de kaart heb ik een blaadje geplakt met een quote van Hellen Keller. Deze heb ik op het internet gevonden en met de computer uitgeprint. ook op de achterkant kun je nog wat schrijven. Het papier dat ik gebruit heb is van de Club Scrap "Destinations"doos.

The card is decorated with the mini-flower stamp by Michael stong (embossed in gold) and some die cut leaves. Inside the card I printed a quote I found on the internet by Helen Keller. You can also write something on the back. The paper i used is from the Club Scrap "Destinations" kit.

Thursday, May 13, 2010

Paper Lantern technique


Bij het blog van de Wednesday Stamper is het thema: "Party" en nu ik toch in de orientaalse sferen ben dacht ik aan lampionnen, vandaar deze kaart en deze (al oude, maar nog steeds leuke) techniek.

Over at the Wednesday Stamper blog the theme is "Party" and with my eastern cards I thought about  paper lanterns and this (already old, but definitely fun) technique.
Wat heb je voor deze techniek nodig?
Natuurlijk je stempels (hier de kraanvogels van Michael Strong), papier in kleur naar keuze, zwarte inkt en bruine distress inkt en je krimper (ribbelaar). Eventueel materiaal om je stempel in te kleuren.

What do you need for this technique?
Of course your stamps (here Michael Strongs crane stamps), color paper of your choice, black ink and brown distress ink and your crimper. If you want to color your stamp you need the right materials for coloring.
1. Stempel met zwart de afbeelding op je papier.

1. Stamp with black ink the image on your paper.
2. Wil je de afbeelding inkleuren? Doe dat dan eerst en daarna voer je het papier door je krimper (ribbelaar).

2. Do you want to color your image? Than do so now. Afterwards you crimp your paper through the crimper.

3. Neem nu de bruine distress inkt en ga direkt met het inktkussen zachtjes over het papier. Het hoeft niet overal even donker te zijn. Nu kun je hiermee een kaart naar wens maken.

3. Take your distress ink and softly touch the paper with the inkpad. It doesn't have to be as dark on every spot. Now you can finish the card to your own desire.
Onderstaande kaart is gemaakt met de kraanvogels van Michael Strong en de bloemen en tekst zijn van Hero Arts.

The card below is made with the cranes by Michael Strong and the flowers and sentiment are by Hero Arts.

Tuesday, December 15, 2009

Chanoeka Dag 5 lesje/ Chanukkah Day 5 tutorial

Op de 5e dag van Chanoeka heb ik een lesje gemaakt. Het is voor een collage kaart.
On the 5th day of Chanukkah I have a tutorial made for you. It is how to make this collage card. Wat heb je nodig? Stempels naar keuze (Ik gebruik hier stempels van Club Scrap: de Hanukkah set en de houten krul stempel van Ivory Elegance), verschillende kleuren distress inkt en een embossing inkt, gouden embossing poeder, je heat gun en wat sponsjes (ik gebruik gewone make up sponsjes van de Etos). O ja en natuurlijk papier om op te stempelen en een foto of plaatje, bv die leuke plaatjes die je nu gratis op kunt halen bij:
What do you need? Stamps of your choice ( I use Club Scrap stamps: the Hanukkah set and the woodmounted curl of ivory Elegance), different distress colors and an embossing inkpad, gold embossing powder, your yeatgun and some sponges (I use make up sponges). Oh and of course some paper to stamp and a photo or some nice pictures, like those you can download for free on: http://countdown.tentwostudios.com/
1. Eerst gaan we de collage achtergrond maken door met verschillende stempels en distress kleuren op je papier te stempelen. Ik gebruik redelijk glad papier, dat werkt hier fijn voor.
1. First we start by stamping the collage background with different stamps and distress colors on your paper. I use rather smooth paper, that works rather nice for this.


2. Om de achtergrond in te kleuren gebruik je een sponsje en kleur je eerst de rand met draaiende bewegingen. Wil je het niet al te donker laten worden, druk niet hard en ga niet te vaak over de kleur heen. Hoe meer je over elkaar heen gaat, hoe donkerder de kleur. Vul daarna het midden met een andere kleur.
2. To color the background you use the sponge. First color the border with a circular movement of the sponge. if you do not want it to be too dark, don't pressure to much on the sponge and don't go over the color again. If you do want it dark you apply several layers. Finish with another color in the middle.

3. Zorg ervoor dat alles goed droog is voor je door gaat met de volgende stamp. Eventueel met je heatgun verwarmen.
3. Make sure everything is realy dry before you move on with the next stemp. You can heat set it with your heatgun.
4. Stempel nu de krul met embossing inkt op je achtergrond, embossing poeder erover en verwarmen met je heat gun. Doe dit ook op het plaatje of de foto.
4. Stamp with empossing ink on your background, sprinkle embossing powder on top and heat with your heat gun. Repeat on picture or photo.
5. Nu is alles klaar om je kaart af te maken. Ik heb nog even de menorah op een apart papiertje gestempeld en uitgeknipt als extra decoratie. Hieronder zie je ook een kerstkaart met deze techniek.
5. Now you have everything ready to finish your card. I stamped the menorah on a seperate piece of paper and cut it out for some extra embellishment on the card. Below you also see a Christmas version of this technique.

Thursday, August 6, 2009

Metal look

Als je geen metaal hebt en toch gecharmeerd bent van de metaal uitstraling, zou je het volgende kunnen doen:

If you like the metal look, but have no metail available and no tools, you might want to try this: 1. Neem een stukje papier (maakt niet uit wat) en haal deze door de Xyron. Heb je dit apparaat
niet, dan kun je ook dubbelzijdig plakband gebruiken (kijk hier ook:
1. Take a piece of paper (any paper is ok) and run it trough your Xyron. If Take a piece of you don't have this machine you can use double sided tape (take a look here:
2. Neem een stuk aluminium folie en leg dit op de plakkant van het papier. Druk het overal
goed aan.
2. Take a piece of aluminum foil and put it on the sticky side of the paper. Press well everywhere.

3. Kleur je aluminium folie met alcohol inkt.
3. Decorate your paper with alcohol ink.

4. Gebruik meerdere kleuren.
4. Use multiple colors.

5. Neem nu je cuttlebug en de door jouw gewenste embossing folder.
5. Take out your cuttlebug and the embossing folder you want to use.

6. Het resultaat als je papier uit de cuttlebug komt.
6. Here is the result when your paper comes out of the cuttlebug.

En dit is de kaart die ik er mee gemaakt heb. Papier van Club Scrap evenals de tekst. Het hart is van Michael Strong.
This is the card I made. Papers are from Club Scrap as is the sentiment. The heart stamp is from Michael Strong.

Friday, July 31, 2009

New project of Club Scrap

Maak je eigen pen met dit project van Club Scrap. Of had je hem nog liggen en wist je niet hoe het moest?
Hier is het nieuwste filmpje van Tricia Morris met een duidelijke uitleg. Het is een geweldig cadeaux voor jezelf of voor een speciale gelegenheid voor een ander.


Milestones Pen Club Stamp Project from Club Scrap on Vimeo.

Here is a wonderful project by Club Scrap: a pen. You can make it for yourself or give it as a present for a special occasion. Did you get the project and did not know how to go about it? Well here is Tricia Morris with an easy explanation on how to go about it.

Thursday, July 16, 2009

Shopping bag

Ik krijg zoveel vragen over die leuke tasje op de pagina's bij mijn Retreat album, dat ik hier even laat zien hoe ik het heb gedaan. Die tasjes zijn doorzichtige stickers, en daarop heb ik de tattoos can Club Scrap geplakt en daarna de sticker op papier en uit geknipt. Alles is duidelijk te zien op onderstaande foto's.

I get so many questions about how I did the shopping bags in the Retreat album, I made some pictures to explain this. The bags are clear stickers and on top I added the Club Scrap tattoos. Than I stuck the bag sticker to cardstock and cut it out. I am sure the pictures below will clarify all your questions.