Showing posts with label scrap page. Show all posts

Friday, March 22, 2019

Purim

As I told here before, I have a suitcase full of old pictures.
Yesterday I was looking in it again and found all these
pictures with people being dressed up!
I lay them on the table and it looked like a sprappage in
the making!

Yesterday and today the Jewish people are celebrating
a holiday with a lot of dressing up! Why? Well read all about 
this holiday here.


And this is my finished page.

I dug into my stash of Jewish rubber stamps and
found this big Purim stamp and the smaller "chag sameach"
stamp. This is Hebrew for Happy holiday.

I used the stiched slots die (by Tim Holtz) to add little
notes of the persons on the pictures. Right in front you see me
and my daughter (about 3yrs old). Next to every picture
there is a number and this corresponds with the notes
I added in the slots.
Thank you for looking 
and have a happy creative day!


Sunday, January 13, 2019

Club Scrap Ultimate Challenge

Have you missed me????

I am trying to get my stash organized in my graftroom! But doing nothig is totally not me.
So while sorting out my Club Scrap stash, I cam across some wonderful papers
and just had to use them for some of the January challanges on the  Club Scrap Chat Facebook group.

This month I go for the Ultimate Challenge. 
Here is the explanation by Julie:

Participate in any SIX of the following challenges each month. 
1. Past Present Challenge 
2. Idea Deck Challenge
3. Monthly Layout Challenge
4. Card Sketch Challenge
5. Project Use It! Challenge
6. NBUS Challenge (Never Before Used Stamp/Stencil)
7. Tool/Stash Challenge
8. Assembly Line Challenge *Note: does not have to be the current kit but must have been assembled this month to qualify
9. Technique Challenge *Note: details posted on the blog each month.


NBUS: Lay out using BananaRama (retreat 09) stencil


Idea Deck - Layout using Jack of Spades


Tool Stash: Using embossing folder


Card Sketch: 


I used BandanaRama '09 papers and a Fizz sentiment.
The background is embossed with a paisley 
embossing folder. For the front panel
I stamped the wooden rubber stamp, that came
with the kit, in versamark and embossed it with
clear embossing powder. 
Next I colored the panel with turquise
ink and the stamped images stand out.
With a few sticky pearls, a ribbon and
the sentiment I finished the card.

Assembly Line: Completed BananaRama Retreat 09 papers
I have been to the retreat in 2009 and never
made the BandanaRama kit. I love it!

Technique: Embossed shape

Papers, shapes and stamps
Oopsie Daisy 2014.


Past and Present Challenge: 
Tribal papers and cut outs.
Cups with Tim Holtz Bigz Tea Time die.

Thank you for looking
and have a creative day!


Thursday, June 7, 2018

Club Scrap June kit: Firecracker

Sharing with you the new hybrid kit by
Club Scrap for June: 
It is a very patriotic kit and 
absolutely great for 4th of July
celebrations. But as you know 
I live in The Netherlands and so we
do not have this celebration, but I came up
with another great use of this kit.
I used the background papers and images to make this
wedding lay-out. It is why I went to Israel.
The Firecracker papers fit the theme wonderfully.
Working on some more pages, that I will share with you 
in the next couple of days.
I used photoshop to make this page
and on the Club Scrap website
you can find some tutorial as how to use
 the program and make your own pages HERE,
Sharon and Pinchas,
I hope your 4ever after will be 
so happy and wonderful.
It was such a pleasure to 
be at your wedding.
Thanks for looking
and have a creative day!

Wednesday, September 27, 2017

Club Scrap September Orchard Blog Hop

Welcome to the monthly
The theme this month is: Orchard.
I hope you have arrived here from 
and have been amazed by her artwork.

I have been playing with the ALSB scrapbooking
pages. This is a wonderful way of getting the most 
out of your papers/ ALSB stands for Assemblyline
Scrapbooking and on the Club Scrap site you find 
information about it HERE.

This time of the year the apples are ripe
and the apples are an important symbol for
the Jewish New Year, that was celebrated last week.
I stamped with real apples, acrylic paint and the grandchildren.
I was using their stamping to make cards.

Together with Owen I baked a special round braided bread,
that symbolizes the circle of life.
We also eat apples with honey to wish each other a very
happy and sweet year.
So hear you see the stamping of the boys
and Owen is holding the result.
These are a few of the finished cards:
I asked Owen to stamp with a few sentiments and
bees in black all over the page, then cut them up in 
4x5,5 inch panels and made these into cards for all
the parents and grandparents.
The tiny apple is a paper punch.

On the right you see a stamped border I created.

First I used the Club Scrap honeycomb stencil with
yellow and orange ink. Then I used several stamp
to make a collage on top. All the stamps come with
this kit, excepy the tiny bee (Michael Strong).

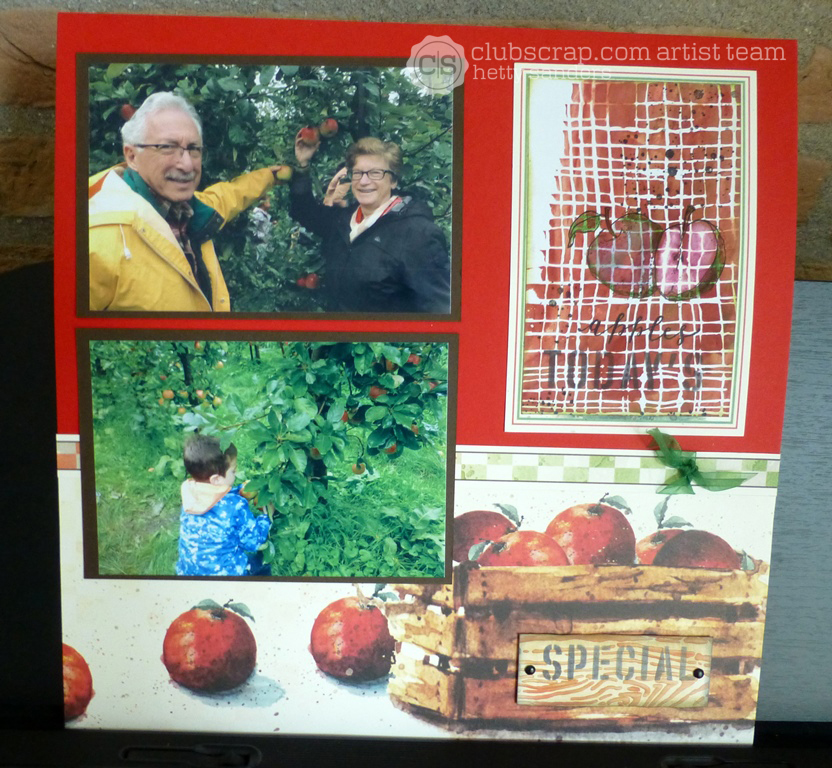
We also went to an orchard nearby to do some apple picking
for applesauce and apple pie. And I even adopted a tree so
we can even do more picking next year!

My daughter and her apples!

And of course i wanted a picture of Ray and me picking
apples too! Owen also had fun getting the apples of the tree.

On this panel I tried this month technique of
but I am not very happy with the result.
Even though you dio not see the marbling to well, 
the panel looks nice on the page. I got the right part of 
the apple a little litter by using some bleach on it.

Nowit is time to see what 
has in store for you. I am sure you will be inspired.

Thanks for looking and have a creative day!


Wednesday, July 26, 2017

Club Scrap July Blog Hop: Vintage Botany

Welcome to the monthly
We are sharing the July kit with you for ideas.
This month the kit is called:

I hope you have arrived here from
and seen her beautiful artwork.

My contribution ia a mini album for this
hop today. You need one 12x12 piece of cardstock for it!

For this album I  created a closure with one of
the wooden buttons that came with this kit.
Only the problem was that they were all lengthwise.
So i sanded the backside and stamped it horizontal.

 I choose one of the beautiful decorated flower papers
for this album and used my score board for all the lines.
Here is the template for the album.
If you enlarge the picture (by clicking on it),
you can read all the measurements.

After cutting some parts away you start folding it.
I added some vintage brown ink on all the folds.

I decorated my album with garden pictures, stamps,
cut aparts and using the stencil that all came with this kit.

On the right side i created a pocket. You can do this for
all 3 if you want, but I wanted some more space for
adding pictures.

Yhis is the album all folded open.

I just love this sentiment and I used it multiple tmes.
It also looks great for decoration in the background.

Here you see I used the stencil for decorating
the background of these pages. The twins have
fun playing in the garden.

Now when you lift the card from the pocket
there is another picture to see, that I added to the
back panel of the pocket.

Also I want to share my digital page again.
After I finished making the page, I printed it, but it was to small for
my 12x12 scrapalbum, so what to do?
I took one of the yellow 12x12 inch pages from the paper kit
and stamped and decorated the background. Adding some
of the cut aparts and I turned the digital page into a real page.


For more inspiration, hop over to
and see what she has in store for you!

Thank you very much for looking
and have a creative day!

Thursday, May 4, 2017

Club Scrap May: Adirondacks

Sharing with you a view to the new 
Club Scrap kit of the month May.
I share with you the digital Adirondacks kit
that has arrived in my mail box.
You can find it HERE for only $ 4,95
It is great for scrapping and making card
digital, but you can also print it and use it
with real paper to make a project.

The paper kit will arrive later this month.

This page is made in photoshop with pictures of the
grandkids exploring our garden.

And here is a paper scrap card.
Papers printed and some of my Club Scrap stash
papers for the body of the card.
For the background panel I also used this
arrow embossing folder.
After it was embossed I took some earth Club Scrap ink
and colored the raised parts of the paper.
Now there are even more arrow on the paper.

The sentiment was cut out with a die and some ink
was added all around before taping it to a piece of
green paper (same as the card base). The square metal
decorations is also out of one of my Club Scrap kits.

Thank you for looking
and have a creative day!