Tuesday, October 31, 2017

Happy Halloween!

It is Halloween today
and even though we do not celebrate
this in the Netherlands I made this little
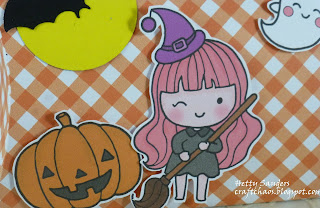
treatbag for my grandsons:
I found some free printable pillowboxes online
through a google search
and printed those to decorate with these cute

I printed several images and cut them out with scissors.
The moon was cut with a spelbinder die.

I used the various images on the different boxes.

The sentiment is from Tim Holtz and stamped.

And here the third box.

These are the boys.
I made some pictures last week before
I cut the pumpkin to make soup from.


Thank you for looking
and 
have a creative day too!


Monday, October 30, 2017

Club Scrap October Artist Team YouTube Challenge

Last month the Artist Team looked at Club Scrap's Pinterest for
inspiration. This month it is 
that we are looking for inspiration. 
Wow are there many tutorials to choose from!
 I had a hard time picking one. 

I hope you have arrived here from
and seen what video she had picked.

You find all participants on the 

Now  here is what I picked: a card folio.
I thought with Christmas soon, I make a version
with Christmas cards.

Below you find Tricia's card folio video tutorial
and if you want to read about it and  print all
the instructions than you go to
 the Club Scrap Blog HERE
I went through all my boxes for papers, stamps and digital images
so please forgive me if I do not mention all the kits I used.
I had a package of the Quad Prints to use for the 
outside of  the card kit and on the cards as well.

This is the closed card kit, that is absolutely fun 
and easy to make if you follow all Tricia's inscructions
and have the printed paper sizes and scoring at hand.

Here the open card kit. It fits easy 6 cards and
as much enveloppes. A great gift too.

Here my 6 cards in the pocket of the kit

and here a quick look at all of them.

Here the first two cards. I love my Gnome stamps.
(The girl version is still available)
The images are colored with zig markers.
The snowflakes and sentiment are rubber stamps 
from Shades of Winter.
 For the 3rd card I  made use of the digital version 
of the Gnome for the Holidays and the owl rubber stamp
from the Scandinavia kit. For the female gnome there 
is a seprate digital version here.
For the 4th card I used the quad paper and rubber stamps
from the Celebrate kit (Jan 2016). The Happy New Year
stamp is from Verve stamps.
For the firework stamps I used two colors of ink that I applied
befor stamping.
Card 5 and 6 are so called bridge cards. You fold them flat
for sending, but once out of the envelop you have them folded 
out and standing up.

Here is the flat version. The left side is in a fold
and the right sight is open. 
The card measures 4,25 inch x 5,5 inch flat.

Here is the card folded out. Inside I stamped the sentiment
and outside i uded the digital images. The gnomes are cut out 
with scissors.

Here another one. I just loved the sentiment and
had to use it. Hope you get lots
of inspiration for your Christmas card.

Now hop over to
and see what she has found interesting to make
and give it her own twist.

Thank you for looking
and have a creative day!

Sunday, October 29, 2017

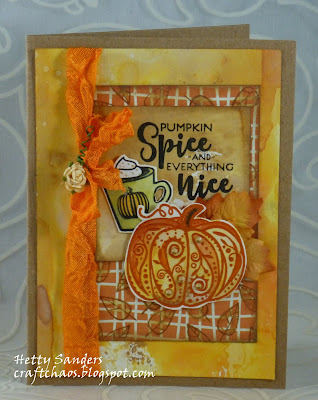
Vive la Verve sketch card for October

Happy Suynday to you all!
Here is my card for the Viva La Verve sketch for October.

You find all the details of the schetch
I started out making this background for my card
with spiced marmelade and vintage photo oxide distress inks.
You add some to your craft sheet and sprinkle some water.
Next ypou move your paper over the ink a few times
until you are satisfied with the ink on your paper.

Next I embossed the pumpkin stamp (Michael Strong)
with orange embossing  and next colored the pumpkin 
with the same distress oxide inks I used for the background.

Now on to the next layer . I used a piece of
design paper and I stamped it with  this cute
leave from Verve Stamps with vintage photo
ink and colored them with a water brush.

The sentiment and the cup of PSL are also by 
The hand dyed  ribbon is by Diana Larson.

Thank you for looking
and have a creative day!

Saturday, October 28, 2017

Saturday Sketch Card: FMS #310

I learned that last week it was Pumpkin Day, but
I have missed it somehow, so today I use my Michael
Strong "Pumpkin Stamps" for my sketch card.

The sketch I used it from the 

I started with stamping the white card with distress
oxide spiced marmalade ink and the pumpkin stamp.
Cutting some design paper matching the color and a
piece of purple paper. The sentiment is from one of my
Verve Stamps. The smiling pumpkin is stamped on 
orange paper and embossed with orange 
embossing powder and cut out with scissors. Then 
attached with foam tape for dimention.

Thank you for looking
and have a creative day!


Thursday, October 26, 2017

TMS 426

I had so much fun making my Christmas card yesterday for
I just had to do another one. So when I noticed this sketch
over at the Tuesday Morning Sketches Blog, I knew right
away what to make.

You find the details of this sketch and more samples HERE.

Papers and stamps are all Club Scrap.
The owls are embossed in silver and cut out.
They are fastned to the felt doily with foam tape.
The branches are from a Tim Holtz thinlit set
called "mini holiday greens".  Then tiny little
sticky gemstones from my stash were added as berries.

The red and anthracite backgrounds are embossed
with tiny dots embossingfolder.

Thank you for looking and
have a creative day.

Wednesday, October 25, 2017

Club Scrap Scandinavia Blog Hop

Welcom to the monthly Club Scrap Blog Hop.
This month the kit is called  Scandinavia
and you find all the products HERE.

Hope you have arrived here from
and seen her wonderful artwork.
If you lose your way you can see
all the participants on the 

And now for my project:
While doing some clearing up in my craft room,
I came across a few CD-covers (remember those?)
and I suddenly knew what I was going to make.
A CD-booklet! I did it before long time ago, but
this is such a great gift idea, that I made it again.
Here is my CD booklet. I tied a ribbon around it
 to keep the box closed.

Here is what you need to make one of your own:
1. CD cover
2. various colors of cardstock
3. double sided tape or glue
4. paper ctter
4. ribbon
6. circle punch
(stapler)

Cut paper as follows:
2x 4"x 12" solid cardstock
1x 5 1/5"x 4 3/4" (inside box cover)
1x 5"x 4 3/4"(outside box cover) 
2x 4 1/2" x 4 1/2"
4x  (ore more if you want) 3 3/4"x 3 3/4

Take the two long strips and score at 4" and 8" both strips.
Fold them harmonica wise. Glue first and last together. 

You can also make a pocket out of the first and the last. 
Then use circle punch as shown here and only glue
sides and bottom together with a small tape.

Place iner and outside paper in the box and adhere
the 4 1/2 " square papers.

Adhere the harmonica folded strips to the inner side of
the box. Make sure strip folds as a booklet. On the top page
you glue a ribbon behind a pice of square paper,
so it is easy to open the booklet.

Decorate your booklet with pictures and text.
Here my finished pages.
I made a booklet of  Opa & Oma day.
I make so many pictures those days
that i can fill many more booklets!

On the first left page I made a little pocket to
and added a tag inside. On the right you see the booklet
totally folded.

Here the booklet is folded open.

You see the pocket where the two parts of the
strips are joined together.

A tag inside the pocket.
For my booklet I played with the wonderful papers
and used the washi tape that came with the kit.

Some of the images I cut out to add to the pictures.
Don't do this to much for then it all ges too bulky and the 
booklet won't close :-)

When the weather is nice we go to the playground,
or to the children's farm.  The days fly by!

I also have two cards for you:
There are so many wonderful images and stamps in this kit
that match wonderful with the design paper.
All the luittle rabbits are embossed in different colors.
And how about a crard for Christmas?
The sentiment is from an older rubber stampset Homemade (2014).
The papers and the doily are so great to use here and the branch is cut out
with a Tim Holtz thinit. The owls are embossed in silver.

Now don't forget to take a look at the Scandinavia Holiday bundle
that just came out!

Now on to the next blog for more ideas.
Go to Jennifer's Blog and see what she has
come up with for your inspiration.

Thanks for looking 
and have a creative day!