Wednesday, February 27, 2013

Club Scrap Up Up Away Blog Hop

 Welcome to the first
 monthly
Blog Hop.
I hope you have arrived here
from the wonderful blog of
and enjoyed her beautiful
projects.

The kit of this month is called
and has beautiful pink, white and turquoise papers
and stamps with a balloon theme.
To inspire you as what to do with
these papers I have made a scrap page
and some cards.
 
This page is made for the
Weekly Chronicles. A feature on the
where some of us make a scrappage
each week on a given theme.
(if you click on the photo, you
can see a larger version and read the text)

 
Here a close up on the embellishment on this page.
It is made with a cloud embossing folder and
one of the hot air balloon stamps
For the stamp I used a multicolor inkpad
and embossed it with clear embossing powder.
Some clouds are cut out of the embossed
paper and added on top with a piece
of foam tape for more effect.
 
And now for some cards.
I have chosen to make some cards that
fit the PSL theme
(Pro Scrapbook League)
of "create a curve".
All info about PSL can be found here:

I went to my favourite Technique Junkies
and found these techniques:
1. Collages Circles Sept 2011
2. Punched Windows Aug 2009
3. Circle Colored Collage June 2012
 
If you are a member of TJ you can
see the photo turorials of these techniques.
 
1. Collage Circles
Great technique to use up all
those scraps you have lying around. Just
punch out a lot of circles, the do not have to be
all the same size like I did here. You can
glue them nice and tidy or ad random on
a backround panel for your card.

Here you see my finished card.
Yes, nice and easy. For you want to
make a lot of cards for PSL.
 
 2. Punched Windows
For this technique you also need your circle punch
First you stamp on your card random images.
Punch out a few windows.
As many windows you stamp your image
on a seperate puiece of paper and cut it out
to lay behind the punched window.
 
Finish your card with a contrasting color
behind the windows. This is one panel
(here the red one).
BTW the left over circles can be used in
the first technique!
 
 3. Circle Colored Collage
Another quick and easy technique.
Here you need a circle stamp (Wings July 2005)
and a few colors of ink.
You can do this 2 ways:
a.(left) first stamp your big image in black
then take the circle stamp and cover the
background with the circles.
 
b. (right) Stamp the background first with
all the circles in different colors.
Dry with heatgun. Now stamp large
image in black and you can even emboss
it in black if you like.
 
All my other project for the Pro Scrapbook League
you will find in the Art Gallery at Club Scrap.
 
As we have 15 blogs participating,
it is time to move on to the next blog
by the so talented and creative
 
If you get lost on the way, or if
for some reason a link does not work
all participating blogs are found on the
Club Scrap Create blog:


Have a creative day!


Club Scrap blog Hop


Come back later today
and see a wonderful and inspiring
blog hop of
15 blogs that will
all present scrapbook pages,
cards and other paper
and digital projects
with Club Scrap's latest
kit called Up, Up & Away.
 
Have a creative day!
 

Sunday, February 24, 2013

Sunday Scrap page

 
Here I am again with my weekly
scrap page.
Today the theme is "Quiet"
and I was so lucky to get these beautiful shots
on the lake this week.
I used Club Scrap "Serenity" papers from the 2012
September kit. These were just perfect for
this theme.

And as usual, I also used some of Michael Strong's stamps.
For the title I used the cloisonné alphabet
embossed in gold and
also I used the cloisonné circle stamp
embossed in gold.
I added  stormy blue distress ink to
the circle and around all the punched
out letters. The page is finished of
with a few sticky gemstones.
 
Shhhhh animated emoticon
Have a quiet and creative day!


Friday, February 22, 2013

Stencil Tutorial

 
At Club Scrap it is PSL
(pro scrapbook league) time:
that means a competition
every week with new challenges for
7 weeks. And if you are not
participating, do take a look for there
is a lot of new inspiration every day!
 
You can find all info HERE.
 
This week the challenge is:
use your stencils.
 
Sitting at my desk and looking
around what to do next
I thought about trying something
and it becaume this tutorial.
 
BTW: it is EASY!!!
 
This is what you need:
white or cream paper
stencils
versamark inkpad (make sure it is juicy!)
white embossing powder
your favourite colors distressink
water
heat gun (not on photo)
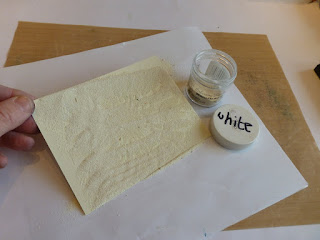
 1. Place your paper underneathe your stencil
and tap with your versamark inkpad
dirtect on your paper.
 2. Remove stencil and sprinkle
white embossing powder on the paper.
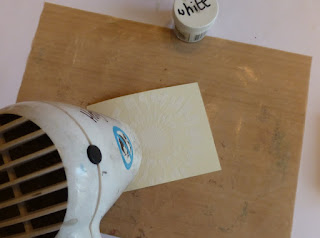
3. Heat the embossing powder. 
 4. This is how it looks after heating.
(you can click on the picture
to see a larger version).
 5. I love working with distress inks,
but you can also use watercolor paint
or ecoline or mediums you like. Give it a try!
 
I used: Mustered Seed, Wild Honey
and picked raspberry
 
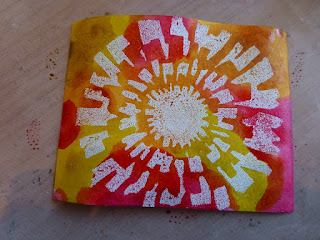
 6. You use the ink direct to the paper.
Start with the lightest color.
Don't worry about the embossed part,
it works as a resist.
7. After covering all of the paper this is how
it looks. Now you can do anything with it
for your card or scrapbook page.

 8. As I follow Tim Holtz's blog,
I learned about this trick.
To add some drops of water to
the ink background. It a splatter through
the ink and I like that effect.
9. Now you can dry your paper
completely.

I easy to clean your stencil
with a baby wipe (not the oily one).


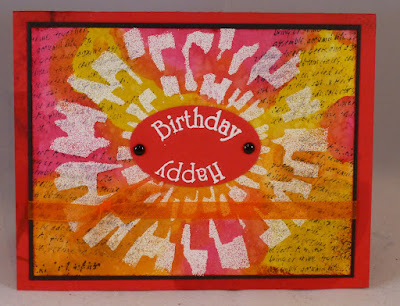
 This is the finished card.
Here are some other backgrounds I made
with this stencil technique.
It is a real quick one.
This stencil is from the Concetions kit
that was designed by Michael Strong
in 2010.
The medaillion stamp fits
perfectly with the stencil.
You find Mikes stamps at:
 
 
I am looking forward to see your
cards in the Club Scrap Gallery.
 
Have a creative day!


Monday, February 18, 2013

New images at Create with TLC

Top Banana Digi Image and Word Art Set

Wonderful new images at
and cheap!
This one is only $ 2.66 (€ 1,95)
and is called Top Banana
and here is a sample for you:
All images are by Create with TLC
even the background paper!
And the monkey....
I got inspired by a post I found
on the Fiskars blog HERE.

Do hop over to
the CTLC shop and have
a look at the wonderful images
that are there!
How to draw a monkey
Have a creative day!


Sunday, February 17, 2013

Snowdrops

Here is my Sunday Scrap page!
This time I used pictures from  the garden
for the theme "Found" in the
Club Scrap Weekly Chronicles.
 
This is the text on the page:
Week 5: "FOUND"
 
look what I found
whenI popped in
to the garden
to feed the birds:
a sweet bunch of
snowdrops.
Does this mean
spring is on the way?
I certinly hope so!

For the top I used the
cloisonné alphabet stamps by
I stamped them with versamark
and embossed them with green
embossing powder.
 
Then I brushed some
evergreen bough distress ink
at the bottom and punched
the letters out.

 
The snowdrop decoration is made
with Michael Strong's leaves
and smallest medallion stamp.
 
Papers for this page are by Club Scrap and
are from the Sorento and  Giddy Up kit.
Have a creative day!