Showing posts with label seahorse. Show all posts

Sunday, August 28, 2022

Michael Strong Zoom Class: Animals


Welcome Crafty Friends,

Last night (for me, but morning in San Diego California)
tere was the monthly wonderful zoom class by 
Michael Strong.
You find all the stamps I used for this class here:

Remember, I do not get a package of cards, but digital 
files with measurements and pictures. I use what i have in my stash.
This class was about 5 different animal stamps designed by
Michael strong himself.

Card #1 Giraffe
I stamped the giraf on white paper and scanned it.
This way I could manipulate the image in photoshop
(with the help of a collegue). Then I printed the
image on orange paper. The border is a picture I found
on internet.

The leaf is a stamp that comes with the giraffe stamp set.
Here the inside of the card.
Card #2 Seahorse
Here I stamped the seahorse on blue paper and colored them 
with pencils. The border is made with 2 different sizes of
punches, hologram stickers and blue gemstones.
Inside the card there is a piece of light blue paper.
Card #3 Pony
This stamp with black ink on white paper and colored with pencils.
Next I scanned the pony before cutting out.
I used a piece of a horizontal rectale and enlarged this to make
up the border.  The tiny beads are on a piece of wax thread with
nots to hold the beads in place.

I printed the border twice and used it also on the inside of the card.
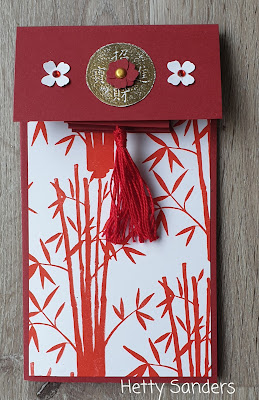
Card #4 Panda
The size of this card is 4 x 7 inch.
The background panel si stamped with the bamboo stamp
from the panda set with red ink.

5 Pand's are glued to a accordeon folded strip
and are hidden behind this flap. The tssel pulls out the 
strip of panda's. I made the tassel with embroidery floss.

The decoration on the flap is 3 punched out flowers
and a circle stamp with chineese characters (embossed
in gold and by Club Scrap).

For the inside I used another stamp from the set.
A row of tiny panda's. Also great to use on the
envelop.

Card #5 Elephant
Of couse again started this card with stamping the elephant and
used pencils to color the image. After cutting out, I put it asside to
make the card. The size of the card is 5 1/2 x 5 1/2 inch.
Embossed pannel on the front with punched out flowers and a 
tiny golden gemstone.

Inside a small panel decorated with the flower that comes
with the stamp set and also colored with pencil.
Finishing the card with 3 flowers in the same colors as
on the front side of the card.

Thank you so much for looking and the next zoom class
will be purple cards on Saturday September 24th.
If you are interrested to take part in the class feel free
to email Michael Strong: stamper.strong@gmail.com

Have a creative day!


Wednesday, August 30, 2017

Club Scrap Blog Hop: Lagoon

Welcome to the montly Club Scrap Blog Hop.
This month the theme of the kit is Lagoon
and is such fabulous blues papers and
great stamps for wonderful pages, cards and projects.

I hope you have come over here from 
and seen her wonderful inspiration.

I had a totally different project in mind and then we went to
the Sealife aquarium in The Hague/ The Netherlands.
So perfect to scrap with these papers!
I used two of the ALSB pages for it and added my own touches.

The left page is a general page with the entry
of the aquarium, the fishes and owen getting
his pirate diploma.
I added some silver embossed sea stars to the page
and teal jewel stickers from the kit.

Also on the cut out fishes strip I added some jewel stickers.

I love using the cut aparts, they look perfect in place.

And here the righ page. My daughter took this awseome picture of
Owen kissing the seahorse lamp in the aquarium. 

On the ALSB discription there are 3 coins on the squares, 
but I needed those for something else, so I used
the small sea star stamp to take the place of the coins.

I just love looking at this picture and the sentiment is just 
made for my page!

So here is the project that I wanted to make and 
couldn't resit making it anyway.

After googling Lagoon projects on Pinterest, I had many
ideas and made a lot of them come true in this
garden light/decoration project.

I wanted to paint a glas pot, but when I looked in t garage 
for a fitting pot, I came across this perfectly colored jar.
With hemp and my macramé skills from some early days
I covered the pot. When arriving at the bottom, I took
all the ropes together and bound it with an extra piece.

To make the pot hang  adding 2x4 ropes and made some knotting
the other way so I could tie the jar to a hook in our
gazebo and added a candle inside.

For decorating I stamped, embossed and colored
the sea star, the sea horse, and printed the mermaids tail.
All were cut out and glued to the jar in between
the netting. 

On pinterest I saw all these wooden beach signs
and i wanted those as well. I made it out of  paint
stir bars. Fist a layer of gesso and next some acylic paint.
When all was dry I stamped the sentiments on top.

As I did not want too many pictures on my blog post
so i made some collages so you can see the jar from
all sides. I added alse some stickers on the pot.
When the light is on in the dark it has a wonderuleffect.
Sorry, I could not make a good picture in the dark.

Underneath the jar the ropes are also decorated.
Here I added the coins, glued the shiny sea stars that
came with the kit, added more stamed woodsies,
a few real shells and a mermaids tail.

Well, that was it for this month. Hope you will go on
the see what 
has come up with on her blog.

If you loose your way, you can always go to the
where all the participants are linked
and where you can also link your own project.

Thank you for looking
and have a creative day!


Sunday, July 23, 2017

Create with TLC Vintage Summer Blog Hop


Welcome to the
I hope you arrived here from
and see what awesome art she made.
If you happen to loose your way,
you can always go back to the Create with TLC Blog,
where you find all 14 paricipants.
You don't want to miss any blog,
for on all blogs you can find FREEBIE images.

Now let's show you what I came up with:
When i started making mycards, I had a slight
printer problem.....everything came out sepia!
Needed to order new color refills, but that took time,
so as this is a Vintage Summer hop, I thought it
was just a fun coincidence and I decided to use them
for my cards.
This card is build up in layers. I was thinking
of the old fashioned photograpers, where one
poses for a picture and then it is behind
a cut out shape. 
Here is the colored image for you to grab and make your own 
cards with. Just click with your right mouse button
and save it to your computer.
I cut out the shape from kraft colored cardstock
and embossed it with a wavy shape, that I colored 
with vintage photo distress ink. The sentiment is also from 
Create with TLC and you find it as another freebie below.
So I decorated the card with paper flowers, a ribbon
and some cut out shells. I colored the shells with 
glitter glue.


For my second card I wanted a little more color and 
for this I  used a few stencils and distress oxides inks.
The sun is a die and the sentiment is one I found in my
Create with TLC sentiment folder and perfect for this card.
At the bottom of the card some raffia is tied around
and a flower added. Love the powder pink color for
vintage cards.

Yeah!! my cartidges arrived yesterday and now I can print the 
Summer image in color. I decided to make some ATC's with it.
So I printed the image small size (that is the advantage of
digital images, you can use them anysize!)

This is card 1:
atc's are 3,5x2,5 inch, so it is small
even though you do not see this on the picture.
The sentiment is another oldie from
Create with TLC, the seahorse is by

For card 2 I used the shell stamp by
Michael Strong and added cute little 
sticky pearls. I cut up the sentiment
for a more decorative look.

Here - on card 3 - I used the complete sentiment.
Blue baker's twine because of the sea
and the fish stamp from Michael Strong
is stamped on shrinky dink, so now it
is small enough for the atc.

Well enough ideas I think for you to use the
great image and sentiments from Create with TLC.

Not enough? Go to 
and see what she has come up with
and what freebies she has for you.

Thank you for looking
and have a creative day!


Saturday, February 4, 2017

Saturday Sketch Card: FMS273: seahorse


Today my sketch card is for the 
and I used stamps by Michael Strong.
This is the sketch
and you find all the details HERE.

For the waves in the background I used the steam
stamp of michael Strong's coffee set. The stamp is used 
right and left to have the waves from all sides. I used
3 colors of blue for stamping and added some metallic
dots as the water bubbles.

The seahorse is the smaller one of the seahorse set
and stamped in brown. Then I used the blending tool
and an orange marker for coloring.

The sentiment is by Javajoanne.com.

Thank you for looking
and have a creative day!


Saturday, September 27, 2014

Saturday card: seahorse

This week on the Michael Strong stampgroup
we had a card captain (that is one of the members
who shares a card from Monday to Friday)
who showed a card each day with  a theme:
a Michael Strong stamp in combination  with the
Stampin'Up! set Work of Art.

As I have this set too, I decided to follow her
idea and here is my card. The background for this
card is made with bistre/ bister (a fun powder
that is used in combination with water for coloring).

The sentiment is a stamp by JavaJoanne
The seahorse is also colored with bistre.
When the colored powder is on a palet
and you add water,you can use this to color
your image with a brush.

Hope you will come back again tomorrow
when we have a Michael Strong Blog Hop
with 11 blogs participating and stamps to win!!

Thanks for stopping by.
Have a creative day!


Saturday, July 5, 2014

Saturday card: Seahorse

Summer is here!
Nice warm weather,so time for summer cards.
Summer makes me thing of the sea and so I got out 
and stamped them on kraft paper.
I stamped themwith black archival ink and
colored them with pencils. On kraft paper this 
gives a nice soft look.

The white piece of paper is torn and decorated with
two sizes of punchinella that I used as masks
with light and dark blue ink and a blending tool

The seaweed in the background is stamped with versamark
and embossed with silver embossing powder.

Some ribbon and sticky silver gemstones
are used to finish of the card.

Thanks for looking!
Have a creative day!