Friday, October 31, 2014

TimHoltz October tag: Happy Halloween


Here I am with my October tag for the TimHoltz blog.
Ans the last day of October is a special day,
it is Halloween. This is mostly celebrated in the
United States,but with the internet it has come
to other parts of the world as well. In the Netherlands
it is not celebrated, but there are some theme parties.

The children do their "trick and treat"on another 
day. We have St. Martin's Day  on November 11.
Then the children come to our door, sing their song 
and get their treats.

Here is my tag to wish all my American friends\
a Happy Halloween today!

Inspired my Tim's tag, I made my own. 
For all Tim's instructions you go HERE.

The cat stamp and the letters BOO are stamps
by Michael Strong. They are stamped in black
and embossed with black embossing powder.
The background of the tag is made with Tim's
Halloween letter stencil and gesso. I ordered
a few of the new distress sprays to try them
and I do like them. So many colors. I am adding
them to my wish list for the Holidays!

The spider you see is a stamp by Stanta Rosa.

The sentiment is from the set Simple Sayind CMS 115.

Have a creative day!

Wednesday, October 29, 2014

Club Scrap Homestead blog hop:card box

Welcome to the  monthly  Club Scrap blog hop.
This months kit is called
HOMESTEAD
17 designers have come up with totally
different projects to inspire you to make good
use of your kit. I hope you came over from 

If you get lost on the way you can always go back to
the Club Scrap Blog to see the complete list
of blogs that participate.


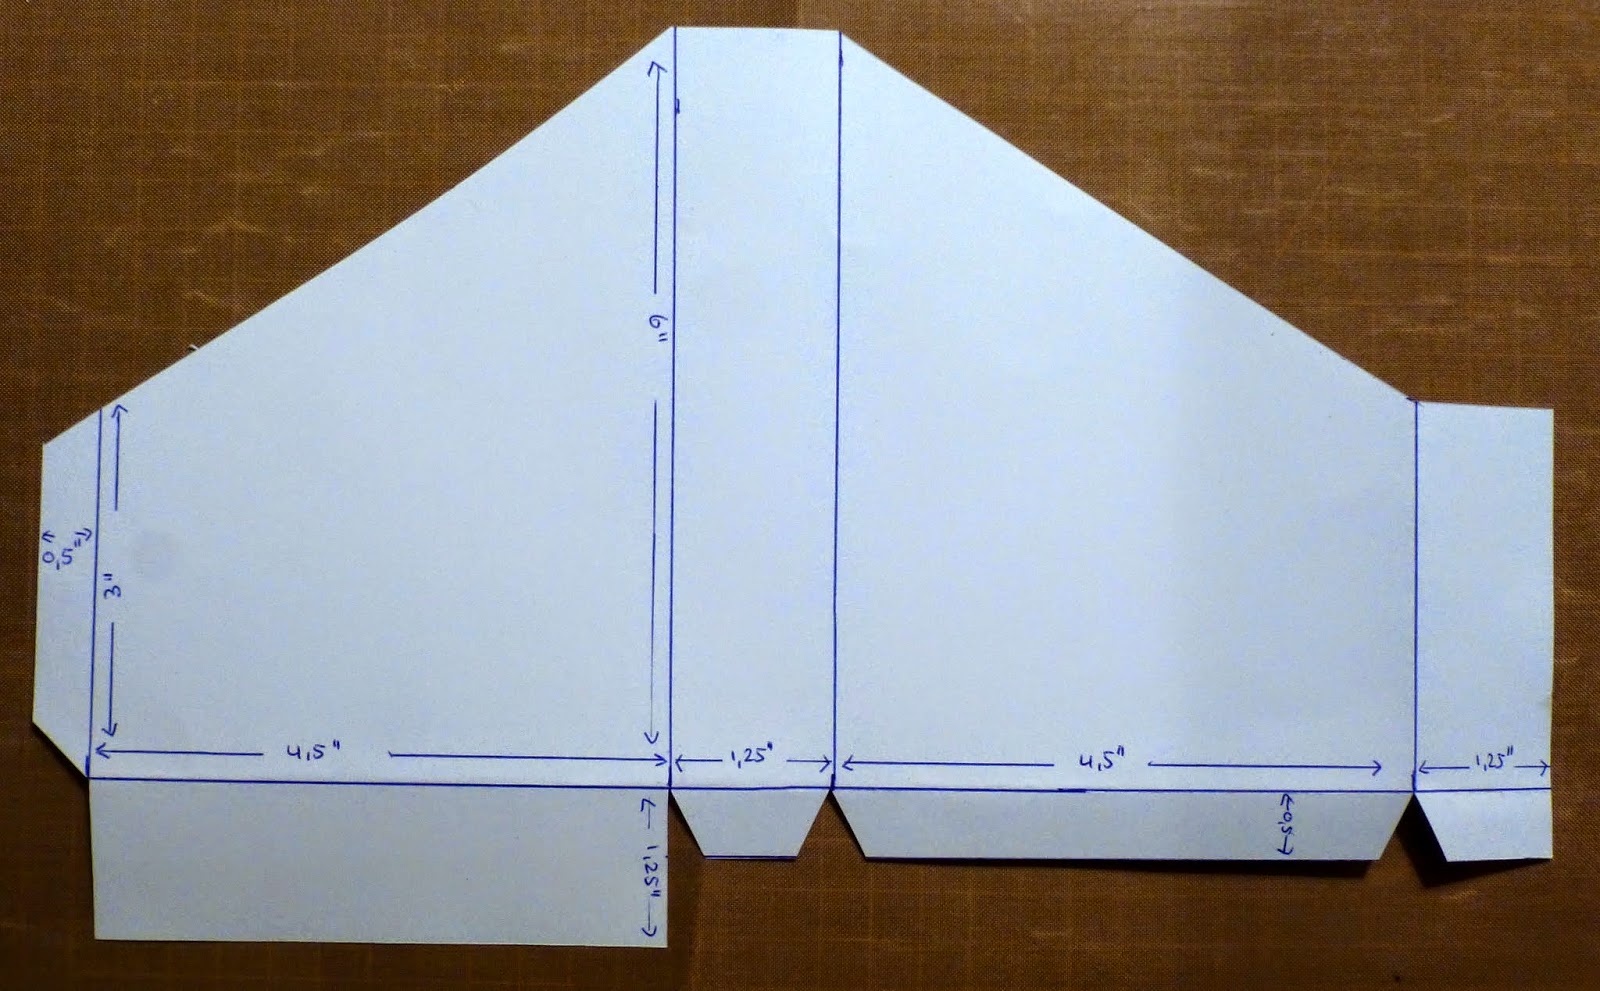
I came up with a card box for you. Great to use as a gift.
I made 3 compartiments to this box,but you can make as many
as you want. You can give them lables like: birthday, get well etc.
Here is the template for the box:
(click on the picture for a larger version and this
way you can see all the measurements)

For one compartiment you use a 12x12 piece of paper.
A strip of 4 5/8 x 12 inch is left over after making
the box and thesecan be used to make cards.

Cut the compartments from the colors desired
and tape or glue them together.
Also tape or glue  the compartiments together.
Now it is time to decorate the box.
I used a ribbon that came with this kit to tie
around the three boxes And at the back of the
boxes I added the word cards (typed with the computer
with the Nashville font).

Of course I will share some of the cards I made.
Each compartiment can hold about 8/10 cards
(less if you add the enveloppes).
For the cards I used something that did not come with 
the kit.It is called bistre and at this time very popular
in the Netherlands. It comes in 9 colors.
You can find it HERE.

This powder is very easy to use. You just need some water and
 you can use it for coloring or to make wonderful backgrounds.
You can also make your own spray with this in a mini mister.
Add just a tiny bit of powder on your paper,
spray it with water and move around.
You can also put the powder on a craft sheet and
spray it with water and put the paper on top to 
swipe the color on your card.
Here you see the red I used for my cards.

If you have a little on your craft sheet and a brush
use this to color.Here I used it to color the label for the box.
Now I will share the cards with you.
Sorry,back to my coffee theme this month :-)


Hope you are inspired.
If you need more inspiration,please hop over to


Creative greetings,


Sunday, October 26, 2014

Sunday Scrap page: Hermitage


Today my page is about a visit to 
The Hermitage in Amsterdam. This museum
has changing exhibitions and they now have one
about tableware from the Tsars.
Absolutely beautiful plates,cups, dishes etc.

We had a great time looking at all the beautiful
things that were displayed.
For my page I used Club Scrap papers from 
Artifacts and Bon Appetit and
Michael Strong's coffee cup.
The cups are embossed with gold embossing
powder and colored with distress markers
(tumbled glass,broken china and white).
From this photo I made a pocket, so I coud
save the tickets in there.

It was absolutely worthwhile to go to the
Hermitage. You can have a peek HERE.

We made many pictures,everything was so
beautiful. Look at these Frog Plates.

and look at this fish bowl:

or how about this melon  dish:
or this leave dish:
and don't you just want his as a gift too?
For that is what the royalsdo,giving each other tableware.

Hope you liked that you could have a peek 
at this exhibition too!

Have a great Sunday!


Saturday, October 25, 2014

Harvest Card

Here is my card for the Harvest challenge by
Michael Strong on the Michael Strong stampgroup.

I used the Autumn Cameo stamp and the Owl stamp
by Michael Strong. You find his stamps HERE.

This is the background of the card,made with bistre.
I stampd the harvest cameo stamp first and
used clear embossing powder.
After that I used green,yellow and red bistre
to color the background.
The owlis stamped and embossed in copper
and colored with yellow bistre.
For the eyes I used a sticky yellow rhinestone.
The sentiment is also one of Michael Strong.
It comes from the set Words & Phrases.


Have a creative day!


Sunday, October 19, 2014

Sunday Scrap page: Pumpkin Marmalade

Even before Michael Strong shared his free
digital pumkin stamp ( go here), I had the idea of
making the pumpkin marmalade. And the making of is sure
worth a scrap page.

For this page I used Club Scrap's Oopsie Daisy papers.

I printed out the pumpkins in a small size and in a row on 
heavy cardstock and colored them with disress markers.
When they were finished i added some glitter glue for
extra dimention.

These letters came with the kit and i colered them orange
and stamped on them with vintage photo ink and an autumn cameo
 stamp by Michael Strong. The leaves are cut with a Tim
Holtz die called Autumn Gatherings

As for a English version of the recipe, you can google
it. This one is close to my recipe:

Have a lovely
and creative Sunday!


Saturday, October 18, 2014

Saturday Card with a recipe


Recently I made some Pumpkin Marmalade
and to decorate the jar and the card I used the free
pumpkin image from Michael Strong's blog.
You can find the imag here.

For the lttle card  I printed the recipe on heavy white
cardstock and folded the card, Then colored the pumpkin
with distress markers and cut it out,glued it to orange paper
and cut it out again. Added some green sticky gemstones.
For the background I used a piece of light brown paper
 and stamped Michael Strong's cloisonne square stamp
in vintage photo just lightly. Added a ribbon and on top
stuck the pumpkin with foam tape.
Another image of the pumpkin was colored for the lid of he
jar and cut out with a circle die. For the orange paper
I used a scalloped die. Glued all together and with foam 
tape to the jar.

Inside my card I printed the recipe. As you can see this
is in dutch. i googled an English recipe for you that
is very close to the one I used:

Thanks for looking and
have a creative day!