Thursday, December 31, 2015

Tim Holtz December 2015 tag

Inspired by Tim Holtz 12 tags
this is my December tag.
You find all the tutorials for this tag
on his blog HERE.

As I do not celebrate Christmas, I made 
a New Year tag,wishing you all
a very Creative and Inspirational 2016!

I decorated the burlap background with the coffee ring 
stencil and vintage photo spray ink. The coffee
cup die and snowflake are all by Tim too.

The bow is made with the bow builder paper punch
by Stampin'Up!. Happy is a die I have to make
happy new year,not sure which brand it is.

The real coffee beans are glued on the burlap with
hot glue and the tag is fastned with staples.

Thanks Tim Holtz for a wonderful  year of tags and
techniques. Hope this goes on in the next year.

Thank you all for allways looking and your
wonderful comments!


Have a creative day!


Happy New Year!

2015 was such a wonderful year,
but we have to say goodbye to it 
and ring in the new.
As we say: we still have the pictures!

Together with my grandson
I made this card to 
wish you all a
happy
healthy
creative
and may all your dreams come true
New Year!


Wednesday, December 30, 2015

Club Scrap Blog Hop: Navigation


Welcome to the last Club Scrap blog hop of 2015.
I hope you arrived at my blog from 
with her wonderful projects.
As you know all the bloggers are always listed
on the main Club Scrap Blog

The kit of this month is called Navigation and
so it is all about boats. As you see the above picture,
that is what I see from my top window! It is 
Lake Westend and we do have a boat. It is
in winter storage now, but during the season
we float about and I like to keep a journal as
to when and where we go. This paper was just
perfect to make a boat journal for next year!
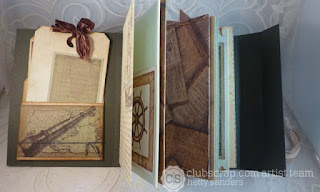
Here you see the finished journal.
It meaures 6"x 4,5"and I made a template for
you on how I folded the outside.
You need a piece of 6"x 12"to make the 
cover of the album.

(click on the photo for the larger version)
score the page at 4,5- 5,5 - 10 - 11.
In between the 4,5 and 5,5 inch you make the holes
that will be used to fasten the inside pages.


I used 3 times three folded pages for the inside.
6x 5,5"x 8,5"and

3 x 5,5" 12".This is the middle page in each signature.
Score this at 4,25 and 8,5. The extra 3,5 is used
to make a pocket
by folding this towardsthe inside.
I did not want to fasten the pockets with double sided tape
(for usually that opens after while when you add things
inside) soi choose to sew it, each pocket in a different 
stich.I thought it looked fun with the boat theme.
Here he see all the pages inside the journal.
I made a pocket on the front inside
and on the back where I could add tags to go
on the pages,when we will be going with the boat.

Here are 3 tags ready to be used. They will be added on 
the page when done.

I did not totally finish the pages of the book, that will
happen when I use it on our the trips that we will take,
depending on what we do and wherewe go.

Just a little decoration here and there.
This is the complete outside of the journal. In the middle
you see where all the scrap floss comes together from sewing
in the pages. I used some beads from a previous kit
for decoration.
On the front I added also a picture of our boat.
We have it already for 15 years.
On the front I printed out:
2016-boat journal - Onyva.
"Onyva" is the name of our boat and is French for:
"Let's go".
The anchor came with the kit, just added the steering 
wheel on top.

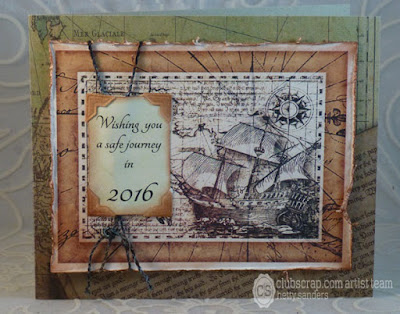
And this is the last card: so easy to make with just
the cut up part, a piece of lovely scrapbook paper, 
a fiber and a printed sentiment.

I wish you all a safe and creative journey into 2016.
May you be blessed with health and happiness
and wonderful friendships!

Please hop on to 
and see what she has in store for you.
See you next year!


Tuesday, December 29, 2015

Sneak Peek

Sneak peek of my blogging for tommorrow.
I am finishing u my Navigation project
with the Club Scrap December kit.

Hope you stop by tomorrow.

Blog Hop

Have a creative day!

Sunday, December 27, 2015

Sunday Scrap Page: 1st Christmas


On this last Sunday of 2015 I share with you
the first Christmas of the twins on my scrappage today.
Aren't they adorable?!!

For this page I used Club Scrap Christmas paper designed
 by Michael Strong  and also the tree and number stamps

This border was printed n the 8,5 x 11 inch paper.
You can heat it and add embossing powder. I used
red and glitter white embossing powder. I seems easy to do,
but i found it rather difficult and here and there you see some
spotsof embossing powder where it should not be.

The text of 1st Christmas and the babies names I printed with
the computer on heavier paper.

2 babies,2 trees,just not exactly the same.
This on is stampedon a background that first was
treated with somebistre powder. The other tree was 
stamped and embossed on the plain green paper.
Then both cut out with scissors and decorated with 
a pearl in top and gemstones on the tree.

The numbers are stamped on green and red paper
with green and red embossing powder.

Thank you for looking!

Have a creative day!

Saturday, December 26, 2015

Merry Christmas Day2

On the 2nd Day of Christmas or for some Boxing Day
I share with you the last Christmas card  I make for this year.

I hope you all have some wonderful warm celebrations,
delicious dinners and the most fantastic gifts you always wanted.

For this card I started with this background paper from
my stash (so don't ask me how I did it). I have a full box of 
papers I intendto use a lot the coming days. 

Then I started stamping the stars by Michael Strong on green paper
 and embossed  them in gold. and cut them all out. With 
double sided foam tape I arranged the stars in a
wreath shape on the card.. Punched a whole right and left to the
top star and put a organza ribbon through to make the
bow on top.

Also stamped some red circles and embossed them with 
red embsossing poder. Cut themwith a 1 inch circle punch. 
The sentiment is stamped and embossed in black and
cut out like a banner. A few read pearls ans the card was done.

Thanks for looking!


Have a creative day!


Friday, December 25, 2015

Merry Christmas


Merry Christmas
to all my friends!
May all your celebrations be wonderful
and a latte fun.

I made this card out of the many papers I had lying around
trying different techniques,for I need to clear my desk 
for a new year of crafting fun, so don't ask me what 
techniques where uses,I have no idea.

The sentiment is typed with the computer with the
free font Type Right! that you find HERE.

Oh and my elf...he is called Mocha for the first thing he
wanted after his long trip was a cup of coffee!

He will be meeting all his new friends at
http://dianamlarson.blogspot.nl/2015/11/3rd-annual-elf-antics-linky-challenge.html


Have a creative day!


Thursday, December 24, 2015

Christmas Wish & visitor

On the Eve of Christmas,I just have one wish:
PEACE
I hope this is happening in the not to far away future!


My card is made with a stap by Michael Strong.
an ambossingfolder by Tim Holtz and a flower punch.

The I want you to meet our new Elf.
I asked him to come some time ago,but it ook
quite a while to arrive. He told me he will arrive 
sooner next year and check out our house in the mean time.

Together with the elf I wish you all a wonderful Christmas
and a warm and merry time with everyone you love around you.